Deployment Package
1 Background
Moving configuration and code between systems in a Publishing Server project is not straightforward. Deployment packages exist to solve this.
This document describes the deployment package format and how to create and deploy packages.
The recommended way to deploy them is the Package Deployment Process, which removes the need for direct server access and manual scripts.
The folder drop and pkgdeploy.bat methods remain available for cases the Package Deployment Process does not yet cover or for more automated CI/CD use-cases.
2 Introduction
This manual describes how to create and deploy a deployment package. Deployment packages can be used to transfer configurations from one installation to another, for example from the development system to the acceptance and production systems.
The deployment package can contain:
- Publishing Server plugins as deployable jar files
- Java Libraries for Glassfish domain lib folder.
- PluginConfig XML files.
- Xml data file(s) containing content data acceptable by EntityDataService
While export and import via ISON can transfer configurations, this approach requires manual steps for each deployment and is not repeatable. With deployment packages, the configuration is defined once and can be reused for repeated deployments. The process is less error prone and deployment packages have the feature that the tenant (called client in older publications) is converted automatically. So moving of configurations is easy between two systems which use a different tenant.
2.1 Overview
There are three methods for creating deployment packages:
- ISON Repository Explorer (see Section 4): Create and manage packages through the ISON user interface.
- IsonSOAPServiceClient.jar (see Section 5): Create packages via command line, useful for automation scripts. The
IsonSOAPServiceClient.jarcan be found in theworkspace/librariesfolder of the update package. - Manual (see Section 6): Create packages completely manually. We recommend this approach only for advanced users.
There are three methods for deploying packages to a target system:
- Package Deployment Process (preferred) (see Section 7.1): Upload, validate, and deploy a package through the Admin UI. Requires priint:bpm.
- Folder drop during install/update (see Section 7.2): Place the zip file in the
update/deploymentpackagesfolder. The package is installed automatically during the next install/update process. - Manual command line (see Section 7.3): Run
pkgdeploy.batwith the package path while Publishing Server is running.
3 Prerequisites
- Familiarity with ISON configuration is needed.
- Understanding of multi-environment setup is recommended. See the DTAP: Environment Planning Guide for best practices on configuring Development, Testing, Acceptance and Production environments, including the correct
PUBSERVER_INSTANCE_IDconfiguration.
4 Create deployment package
4.1 Prepare Data
To create a package, the user must create a folder in the repository folder of the Deployment Manager plugin. This folder includes other folders which contain uploaded files like Publishing Server plugin, libraries or import scripts. This is a standard functionality of ISON Repository Explorer.
The first step is creating a folder structure for the packaging which includes the uploaded files and the deployment package config XML. The folder structure can be arbitrary.
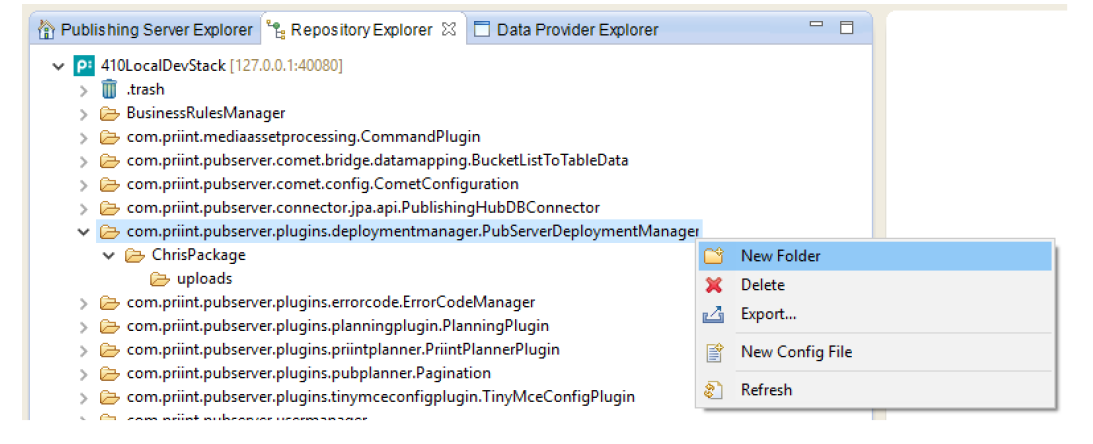
Repository folder of pubserver deployment manager
The next step is to upload files to the package folder(s). There is a new type of config file geared towards deployment package needs - binary.
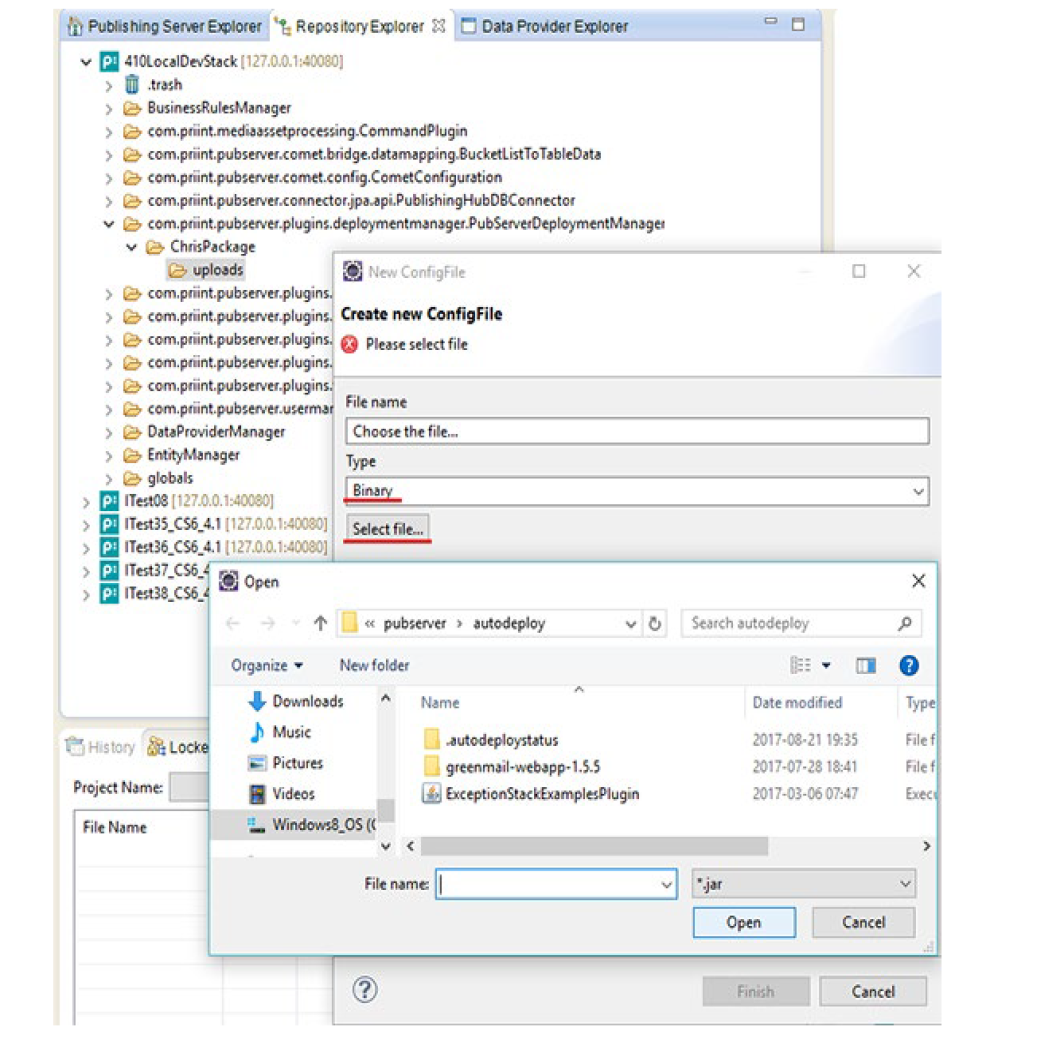
Upload binary file to repository folder of pubserver deployment manager
The file is wrapped into the standard config file XML structure.
4.2 Create deployment setup configuration file
The Deployment Manager Plugin gets the information about the files it has to package in a plugin configuration file which is stored in the configuration folder of the plugin. For each package (zip file), there is a separate config file.
To create a deployment package which includes a set of files which should be deployed, the user has to create a config file for the DeploymentManager plugin. There is no wizard which supports the creation of such a file in the first version. The user must use the standard ISON functionality of the Repository Explorer to create a config file.
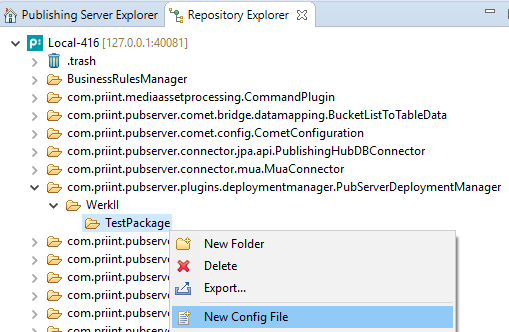
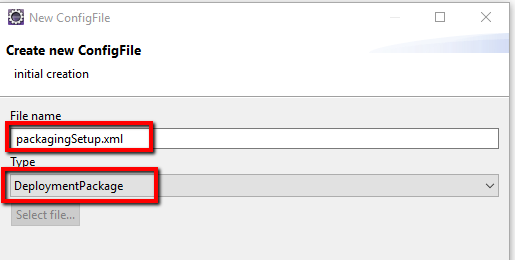
After the creation:
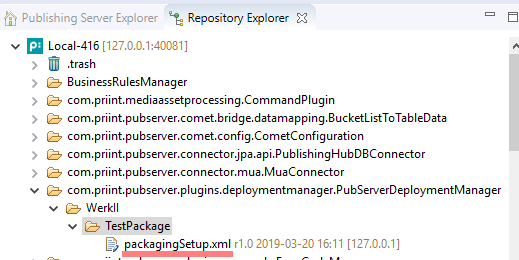
The new config file can be opened in an XML editor. It should have this XML wrapper, which makes it to a plugin config file. The type of the configuration is set to DeploymentPackage.
<con:PluginConfig xmlns:con="com.priint.pubserver.config.manager/20130620" xmlns:usr="com.priint.pubserver.plugin.deployment">
    <con:name>packagingSetup.xml</con:name>
    <con:type>DeploymentPackage</con:type>
    <con:description>This is a Deployment Package</con:description>
    <con:custom>
        <dep:deploymentpackage >
            ....
        </dep:deploymentpackage >
    </con:custom>
    <con:dependencies/>
    <con:instances/>
</con:PluginConfig>
The DeploymentPackage config file has a few attributes and four separate lists which point to files on the file server or repository designated for the deployment package:
| Tag | Type | Description |
| name | Attribute | Name of the package (package name cannot contain underscore character ‘_’) |
| version | Attribute | Version number of the package |
| description | Element | Description of the package |
| jarFiles | Element | List of jarFile elements (see below) |
| dbimports | Element | List of DBImport elements (see below) |
| pluginconfigfiles | Element | List of PluginConfig elements (see below) |
| pluginconfigfilestodelete | Element | List of PluginConfigFileToDelete elements (see below) |
4.2.1 Defining jar file(s)
The JarFile section describes one of the plugin jar files which should be a part of the deployment package:
| Tag | Type | Description |
| jarType | Attribute | There are two types of jar files which can be added to the package: application (plugin) jar which are deployed as an application to the application server or a library file which is copied to the domain lib folder of the application server. There are two possible values:
|
| path | Element | There are two possible sources of the jar files:
|
For the file from the repository (repository prefix) the path should start from the folder of the plugin where the file is located. This is what we see in ISON tree – please look at the screenshots below.
Examples:
Uploaded plugin:
repository:com.priint.pubserver.plugins.deploymentmanager.PubServerDeploymentManager/WerkII/ChrisPackage/uploads/plugins/DemoDataProcessing.jar
Uploaded lib:
repository:com.priint.pubserver.plugins.deploymentmanager.PubServerDeploymentManager/WerkII/ChrisPackage/uploads/SomeThirdPartyLib.jar
active Domain Lib Library:
server:SomeThirdPartyLib.jar
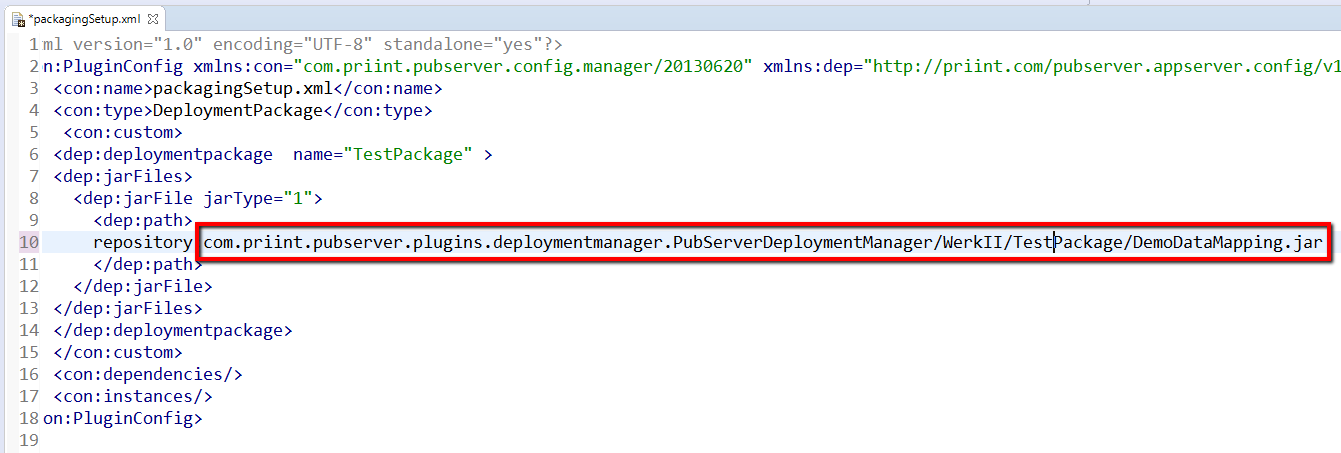
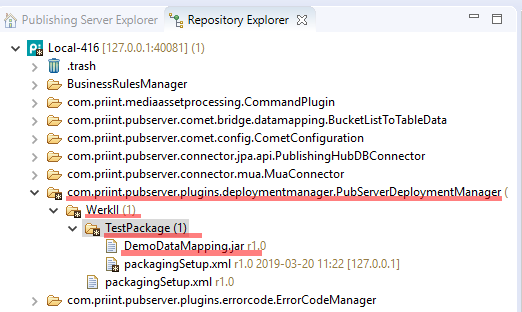
Example:
<dep:jarFiles>
  <dep:jarFile jarType="1">
        <dep:path>
               repository:com.priint.pubserver.plugins.deploymentmanager.PubServerDeploymentManager/WerkII/TestPackage/DemoDataMapping.jar
        </dep:path>
  </dep:jarFile>
</dep:jarFiles>
4.2.2 Defining repository config files
The PluginConfigFile section describes one of the config files located in the Publishing Server Repository which should be a part of the deployment package:
| Tag | Type | Description |
| repositoryentry | Element | Repository path |
The path should start from the folder of the plugin where the file is located.
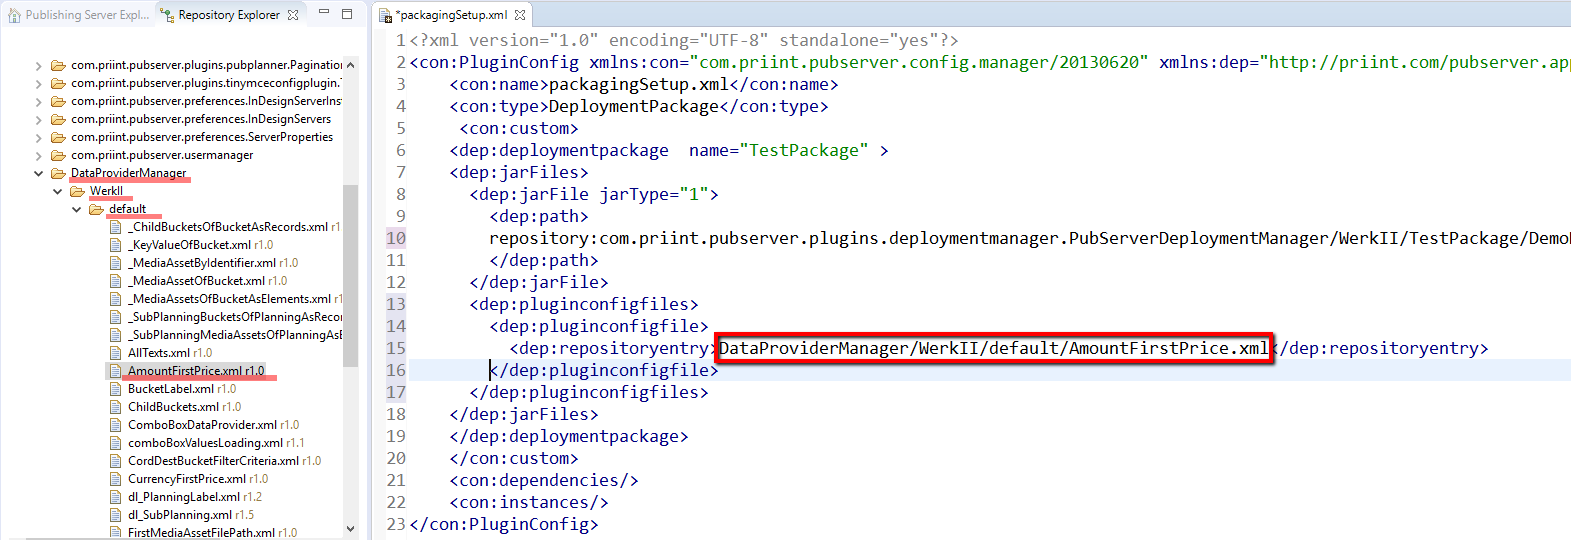
Additionally, there is a possibility to export all files (and subfolders) of the specified plugin folder. To do this, we need to end the path with ‘/’ which means that it is a folder (we can also use ‘/*’ at the end of the path).
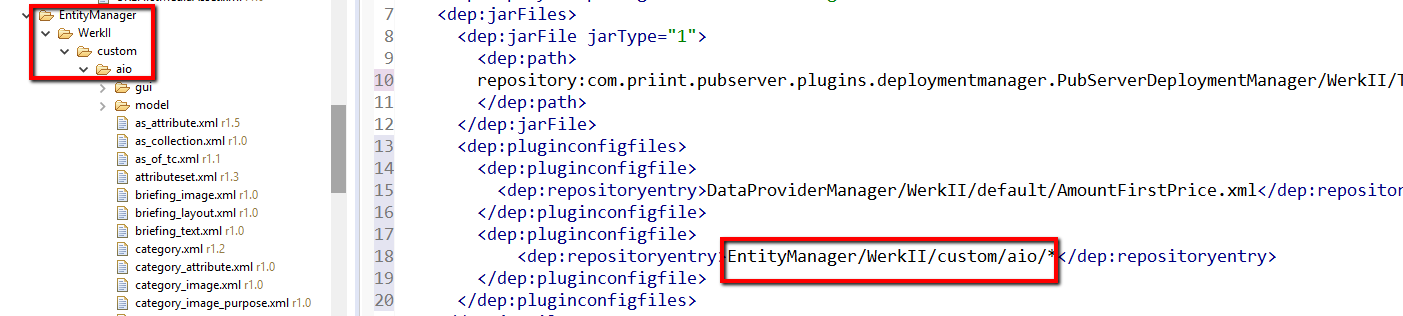
Example:
<dep:pluginconfigfiles>
   <dep:pluginconfigfile>
     <dep:repositoryentry>
               DataProviderManager/WerkII/default/AmountFirstPrice.xml
     </dep:repositoryentry>
   </dep:pluginconfigfile>

   <dep:pluginconfigfile>
     <dep:repositoryentry>
               EntityManager/WerkII/custom/aio/
     </dep:repositoryentry>
   </dep:pluginconfigfile>
</dep:pluginconfigfiles>
4.2.3 Defining repository file(s) to delete
During package deployment, one may want to delete some files from the repository.
A package can contain list of repository configuration files to delete if existing on the target system. Files can be deleted before uploading repository files from the package (p. 4.2.2) or after.
| Tag | Type | Description |
| afterupload | Attribute | A flag to decide when it is deleted (after upload (true) or before (false) |
| repositoryentry | Element | Repository path |
Example:
<dep:pluginconfigfilestodelete>
    <dep:pluginconfigfiletodelete afterupload="false">
        <dep:repositoryentry>EntityManager/WerkII/custom/aio/
        </dep:repositoryentry>
    </dep:pluginconfigfiletodelete>

    <dep:pluginconfigfiletodelete afterupload="true">
        <dep:repositoryentry>EntityManager/WerkII/custom/aio/kp.xml
        </dep:repositoryentry>
    </dep:pluginconfigfiletodelete>
</dep:pluginconfigfilestodelete>
4.2.4 Defining DBImport file(s)
The DBImport section describes one of the DB import files which should be a part of the deployment package:
| Tag | Type | Description |
| type | Attribute | Type of the DB import file. Possible values:
|
| order | Attribute | A number describing the order to execute of dbimport files |
| path | Element | Subfolder(s) and file name of the DB import file |
The file with XML data acceptable by Entity Data Service should be uploaded to the package repository folder as a binary file and added to packagingSetup.xml.
Example:
<dep:dbimports>
   <dep:dbimport order="0" type="ENTITY_DATA_SERVICE">
     <dep:path>
com.priint.pubserver.plugins.deploymentmanager.PubServerDeploymentManager/WerkII/AioModel3/import/AIOData.xml
     </dep:path>
   </dep:dbimport>
</dep:dbimports>
4.2.5 Example configuration file
Example of package setup configuration file:
<?xml version="1.0" encoding="UTF-8" standalone="yes"?>
<con:PluginConfig xmlns:con="com.priint.pubserver.config.manager/20130620" xmlns:dep="http://priint.com/pubserver.appserver.config/v1">
    <con:name>packagingSetup.xml</con:name>
    <con:type>DeploymentPackage</con:type>
     <con:custom>
  <dep:deploymentpackage name="TestPackage" >
    <dep:jarFiles>
      <dep:jarFile jarType="1">
        <dep:path>
repository:com.priint.pubserver.plugins.deploymentmanager.PubServerDeploymentManager/WerkII/TestPackage/DemoDataMapping.jar
        </dep:path>
      </dep:jarFile>
    </dep:jarFiles>
    <dep:pluginconfigfiles>
      <dep:pluginconfigfile>
        <dep:repositoryentry>
          DataProviderManager/WerkII/default/AmountFirstPrice.xml
        </dep:repositoryentry>
      </dep:pluginconfigfile>
      <dep:pluginconfigfile>
        <dep:repositoryentry>
            EntityManager/WerkII/custom/aio/
        </dep:repositoryentry>
      </dep:pluginconfigfile>
    </dep:pluginconfigfiles>
    <dep:dbimports>
      <dep:dbimport order="0" type="ENTITY_DATA_SERVICE">
        <dep:path>
com.priint.pubserver.plugins.deploymentmanager.PubServerDeploymentManager/WerkII/AioModel3/import/AIOData.xml
        </dep:path>
      </dep:dbimport>
    </dep:dbimports>
  </dep:deploymentpackage>
 </con:custom>
 <con:dependencies/>
 <con:instances/>
</con:PluginConfig>
4.3 Execute packaging
After preparing the data and creating configuration file, the user can create the deployment package by running Execute Packaging item from the context menu on the configuration file:
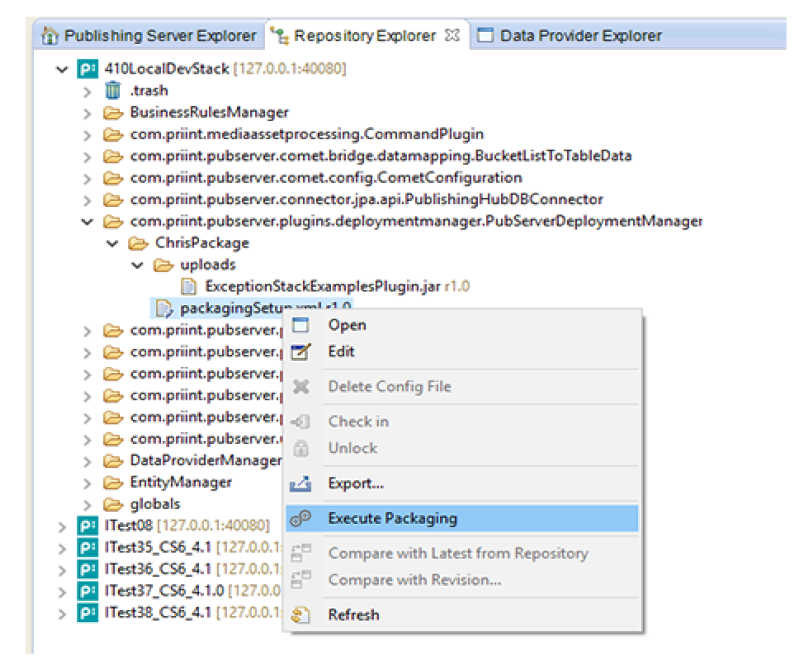
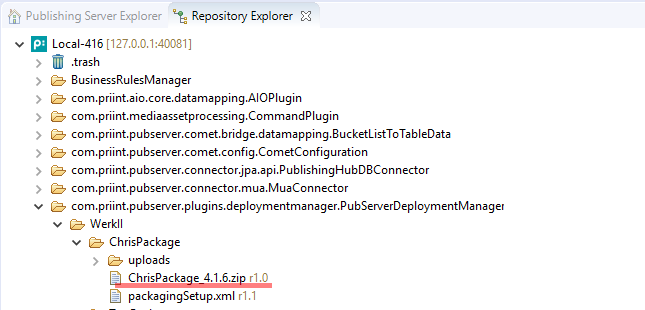
The new config file of type Binary should be created. It contains the data of the zip file:
4.4 Report file
The report file is created using the filename of the zip and the suffix "_report.txt" and attached to the zip file. The Report file has a row for each file which is defined in the DeploymentPackage object using this pattern
<Type><TAB><Subtype><TAB><File><TAB><Status><TAB><Reason>
| Column | Description |
| Type | Type of the file: pluginjar / dbimport / pluginconfigfile |
| Subtype | Depending on the type:Pluginjar: -DBimport: script / xmlPluginconfigfile: - |
| File | Full path (system or repository) of the file |
| Status | OK / Failed |
| Reason | If Status = failed: Errormessage |
Some example:

4.5 Download deployment package
To download the deployment package as the zip file, the user should use Download binary item from the context menu:
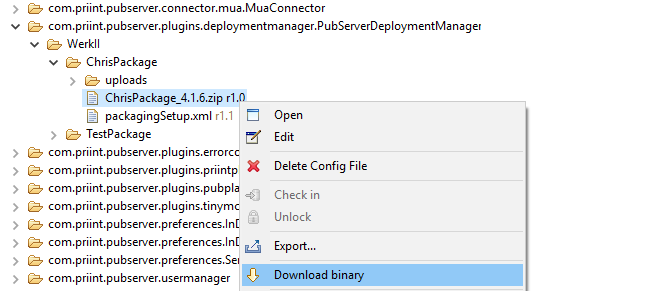
4.6 Verification of the created package
When the package is created and downloaded, we can open the zip file and check its content. Besides, there is a special log file named like the package name and ended with _report.txt inside of the package (please look at p. 4.4). It contains a list of package files and a status of them. If something went wrong during creating a package, there is also a proper information.
5 Deployment packages with IsonSOAPServiceClient.jar command line
IsonSOAPServiceClient.jar allows to create a deployment package via command line. This is useful to automatic scripts to create packages. Additionally, it supports importing and exporting config files from the server.
The basic syntax of the command is java -jar IsonSOAPServiceClient.jar <action> <options…>.
Arguments are passed in GNU-style. Options --help and --help <action> are supported.
5.1 Options
| Short opt. | Long option | Argument | Description |
| --help | Shows general help for the program. | ||
| --help | action | Shows help for the specific command. | |
| -a | --address | address | Address of the server to connect. |
| -p | --port | port | Port of the server to connect (default value is 40081). |
| -u | --user | user | User for login on the server. |
| -s | --password | password | Password for login on the server. |
| -c | --client | client | Project client name. |
| -t | --path | path | Name/path of the file on the server (relative to folder “/pubserver/pluginconfig/com.priint.pubserver.plugins.deploymentmanager.PubServerDeploymentManager/<client>/”). |
| -l | --local-path | local path | Path to a file on local machine. |
5.2 Upload deployment setup configuration file to Jackrabbit Repository
To upload configuration file to the server, call action “upload”. This corresponds to the option “New Config File” in ISON Repository Explorer.
This action accepts options: “--address”, “--port”, “--user”, “--password”, “--client”, “--path” and “--local-path”. All these options except “--port” are required.
Example usage of action “upload”:
java -jar IsonSOAPServiceClient.jar upload -a localhost -p 12345 -u "demo" -s "*******" ↵-c werkii -t packagingSetup.xml -l C:UsersBestEmployeeDesktopmyPackagingSetup.xmljava -jar IsonSOAPServiceClient.jar upload --address=172.16.123.123 --user=demo ↵--password="*******" --client="werkii" --path="packagingSetup.xml" ↵-l="C:UsersBestEmployeeDesktopmyPackagingSetup.xml"
5.3 Execute packaging
To execute packaging, call action “package”. This corresponds to the option “Execute Packaging” in ISON Repository Explorer.
This action accepts options: “--address”, “--port”, “--user”, “--password”, “--client” and “--path”. All these options except “--port” are required.
Example usage of action “package”:
java -jar IsonSOAPServiceClient.jar package -a localhost -p 12345 -u "demo" -s "*******" ↵-c werkii -t packagingSetup.xmljava -jar IsonSOAPServiceClient.jar package --address=172.16.123.123 --user=demo ↵--password="*******" --client="werkii" --path="packagingSetup.xml"
5.4 Download deployment package
To download the deployment package, call action “download”. This corresponds to the option “Download binary” in ISON Repository Explorer.
This action accepts options: “--address”, “--port”, “--user”, “--password”, “--client”, “--path” and “--local-path”. All these options except “--port” are required.
Example usage of action “download”:
java -jar IsonSOAPServiceClient.jar download -a localhost -p 12345 -u "demo" -s "*******" ↵-c werkii -t result.xml -l C:UsersBestEmployeeDesktopdownloadedResult.zipjava -jar IsonSOAPServiceClient.jar download --address=172.16.123.123 --user=demo ↵--password="*******" --client="werkii" --path="result.xml" ↵-l="C:UsersBestEmployeeDesktopdownloadedResult.zip"
5.5 Export config files from the server
To export one or more config files from the server to a zip file, call action "export". The exported zip file is identical to export zips created by ISON.
This action accepts options: "--address", "--port", "--user", "--password", "--path", "--local-path" and "--recursive". All these options except "--port" and "--recursive" are required.
Example usage of action "export":
java -jar IsonSOAPServiceClient.jar export -a localhost -p 12345 -u "demo" -s "*******" ↵-l C:\Users\BestEmployee\Desktop\export.zip -t EntityManager/WerkII -Rjava -jar IsonSOAPServiceClient.jar export --address=172.16.123.123 --user=demo ↵--password="*******" --local-path="C:\Users\BestEmployee\Desktop\export.zip" ↵--path="EntityManager/WerkII" --recursive
5.6 Import config files to the server
To import config files from a zipped export to the server, call action "import". The zip file must be created by this program or by ISON.
This action accepts options: "--address", "--port", "--user", "--password", "--local-path" and "--description". All these options except "--port" and "--description" are required.
Example usage of action "import":
java -jar IsonSOAPServiceClient.jar import -a localhost -p 12345 -u "demo" -s "*******" ↵-l C:\Users\BestEmployee\Desktop\export.zip -d "Description of the check-in"java -jar IsonSOAPServiceClient.jar import --address=172.16.123.123 --user=demo ↵--password="*******" --local-path="C:\Users\BestEmployee\Desktop\export.zip"
6 Manual Creation
This last method of creation assumes that in your project Git is the single source of truth. This section describes two ways to reach that picture in practice: a CI/CD pipeline that produces a deployment package from checked-in sources and hands it off to one of the deployment methods.
This guideline assumes that the Git already contains the source code for the Java plugins as well as the exported configuration artifacts (Templates / Placeholders / Data provider definition) from ISON.
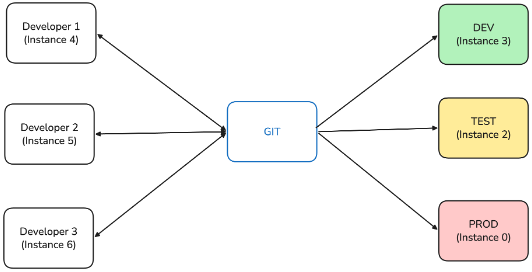
We only provide this guideline as a suggestion, setup of CI/CD pipelines is not covered by priint:suite warranty as it relates to the development process.
Requirements
- Java build system: Maven or Gradle.
- Dependency management: with support for local libraries such as PubServerSDK.
- Access to target environments: through one of the methods. SSH access from the CI/CD runner to each target server is only required when deployment happens via
pkgdeploy.bat. - Artifact storage (optional): on the CI/CD side to keep built deployment packages between build and deploy stages.
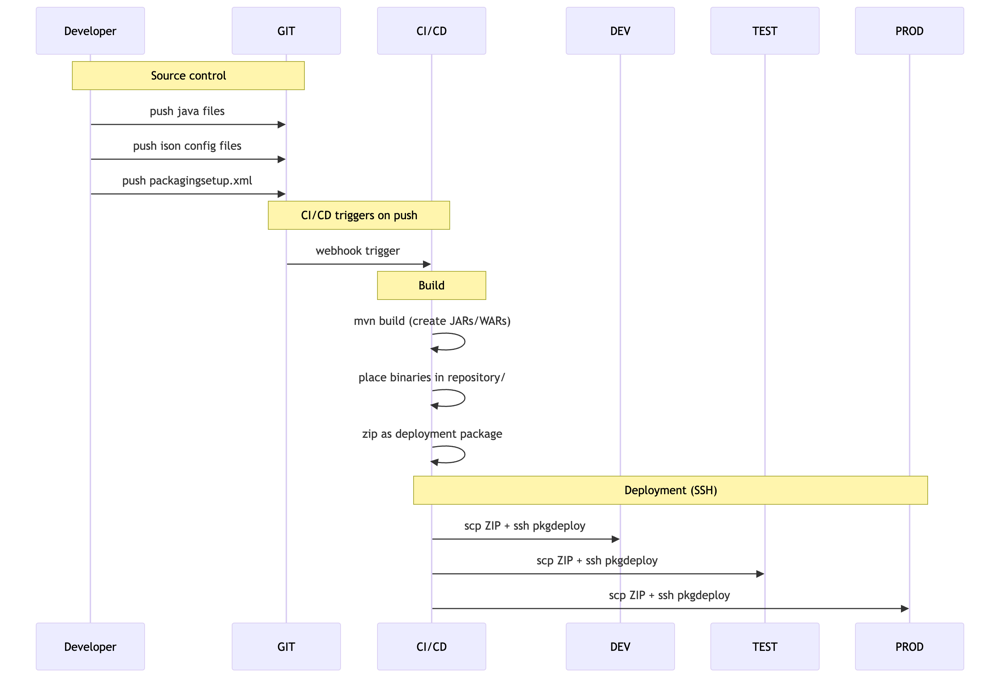
CI/CD builds the package end-to-end
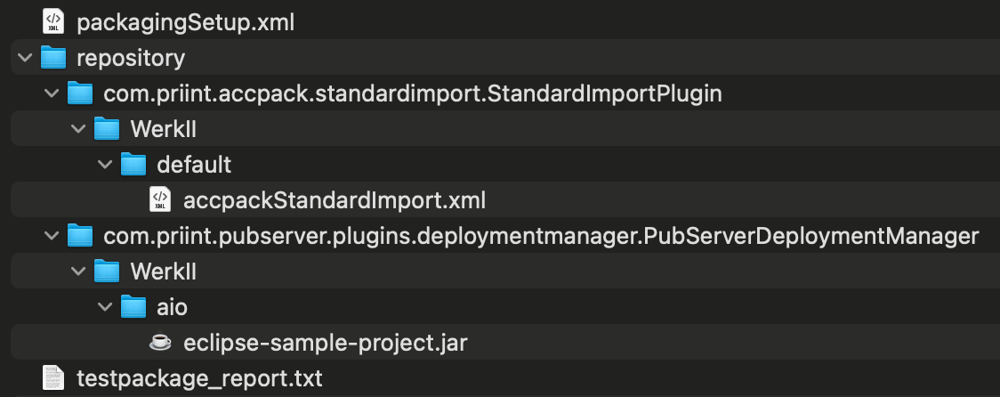
The CI/CD runner builds the jars, combines them with the ISON config files and the chosen packagingSetup.xml, and assembles the deployment package zip directly. ISON is not involved in package creation. The runner then hands the zip to a section 6 deployment method.
The contents of the zip match what ISON would produce:
The sequence is simpler because the ISON round trip is removed:
When using this approach, there's no validation and the package is fully created manually, this means that any validation of the package structure relies on following the established standards in this document.
7 Deploying packages
During deployment the tenant is corrected automatically, so a package built on one system can be deployed to another system that uses a different tenant.
Important! Before installing a new package, consider a backup. See How to back up the publishing server system environment.
7.1 Preferred method: Package Deployment Process
The recommended way to deploy a package is the Package Deployment Process.
It provides a UI-based workflow in the Admin UI that:
- Uploads the deployment package.
- Validates PubServer version, tenant, and project before any changes are made.
- Detects locked files and offers an action to unlock them.
- Deploys the supported package contents and reports the result.
The Package Deployment Process uses the same deployment package format described in this document. Administrators do not need direct server access or knowledge of deployment scripts.
Limitation: The Package Deployment Process does not currently support the deployment of core libraries. If a package contains core libraries, use one of the fallback methods below for that package.
7.2 Fallback: Deploying packages during update/installation process
Use this method when a package must be applied as part of a scheduled install or update, for example when several packages should be installed together during a system update.
There is a folder named ‘deploymentpackages’ in the ‘update’ folder of the PubServer main folder installation. If a package (zip file) is put into this folder, it is installed automatically during the next install/update process. If more than one package is present, they are installed in alphabetical order.

7.2.1 Deployment order
To control the order, create a file named ‘deployment-order.txt’ in the ‘deploymentpackages’ folder. Each line of this file should contain a package filename existing in the folder (the ‘.zip’ extension is optional). If the ‘deployment-order.txt’ file exists during installation/update, the installer processes packages in the order listed in the file.
Important! If ‘deployment-order.txt’ is used, only packages listed in it are deployed. Additional packages in the ‘deploymentpackages’ folder are skipped and a warning is displayed during the installation process.

7.3 Fallback: Deploying a package manually via command line
Use this method when the Package Deployment Process is not available or when the package contains core libraries that the Package Deployment Process cannot handle yet.
If PubServer is running and does not need to be updated, a package can still be deployed using the pkgdeploy.bat script available in the install/update folder for the specified version.
The script requires one parameter: the path to the package to deploy.
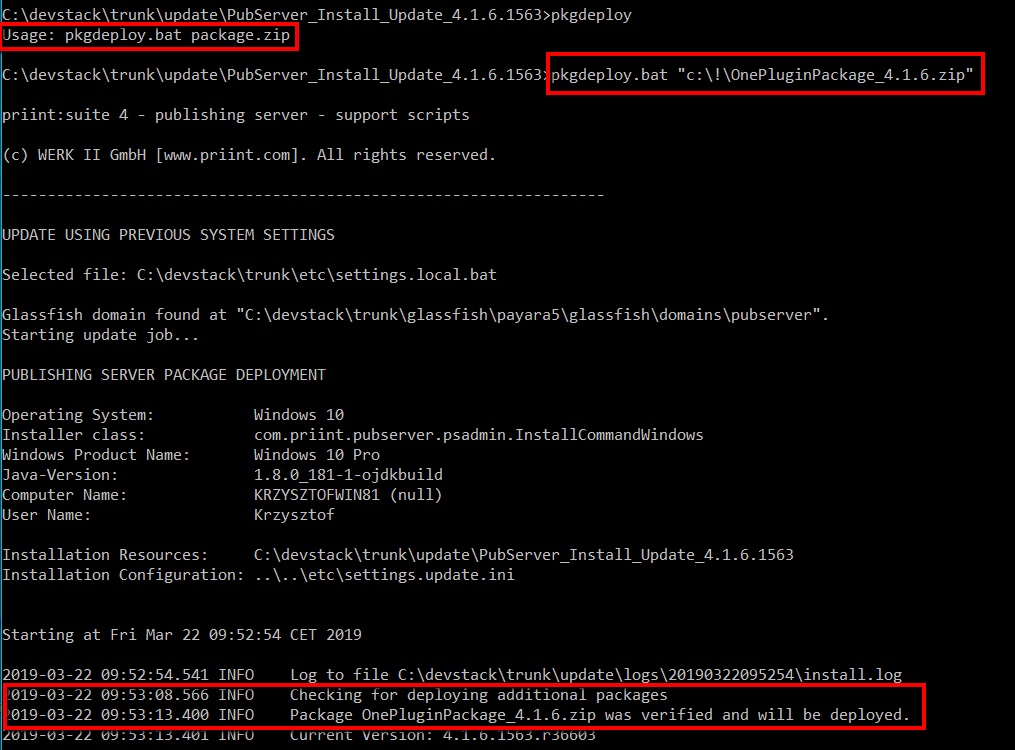
If a package contains library jar files, PubServer is stopped before those files are deployed and started again afterwards.
ATTENTION !!!
Depending on the size of the package, a “Java heap space” error may appear. If this happens, patch pkgdeploy.bat: search the file for the maximum heap size Xmx and set it to a higher value.

7.3.1 Customizing deployment configuration for the package
During deployment using package, each package can (does not have to) own an external configuration xml file (in the same folder as a package, the name should be like the name of the package with additional extension) to customize deployment process.
The file has the following name:
package name + _configuration.xml
e.g. if package filename is AioModel_4.1.6.zip the configuration file would look like:
AioModel_configuration.xml (AioModel is the package name, it is set in packagingSetup.xml).
A configuration file can be used if we want to map repository files into a different location. It can be helpful if we want to import the entity model (files from EntityManager folder) as a different model name.
The structure of this file is as follows:
<?xml version="1.0" encoding="UTF-8" standalone="yes"?>
<con:PluginConfig xmlns:con="com.priint.pubserver.config.manager/20130620" xmlns:dep="http://priint.com/pubserver.appserver.config/v1">
    <con:name>AioModel_configuration.xml</con:name>
    <con:type>DeploymentConfiguration</con:type>
    <con:custom>
    <dep:deploymentconfiguration >
               <dep:repositoryFolderMappings>
               <dep:repositoryMapping srcPath="EntityManager/WerkII/custom/aio/" destinationPath="EntityManager/WerkII/custom/dev03/"/>
               </dep:repositoryFolderMappings>
               </dep:deploymentconfiguration>
               </con:custom>
    <con:dependencies/>
    <con:instances/>
</con:PluginConfig>
We can define many repository mapping elements. The installer checks the path of the repository file from the package while deploying repository files from the package and if it is matched with the repository mapping from the configuration file, it will be moved to the new location.
In the example above, the files of ‘aio’ model will be uploaded as ‘dev03’ model. The installer recognizes that these are EntityManager files and will change not only the filenames but also the dependencies inside.