Messaging
The Messaging module enables users to communicate directly within Neowise. It supports user-to-user messages, annotation notifications triggered by note mentions in the Review stage, and system notifications generated by background processes. All communication is centralised in the Message Center, which is accessible from any view in the application.
1 Opening the Message Center
The Message Center is opened by clicking the bell icon in the top toolbar.
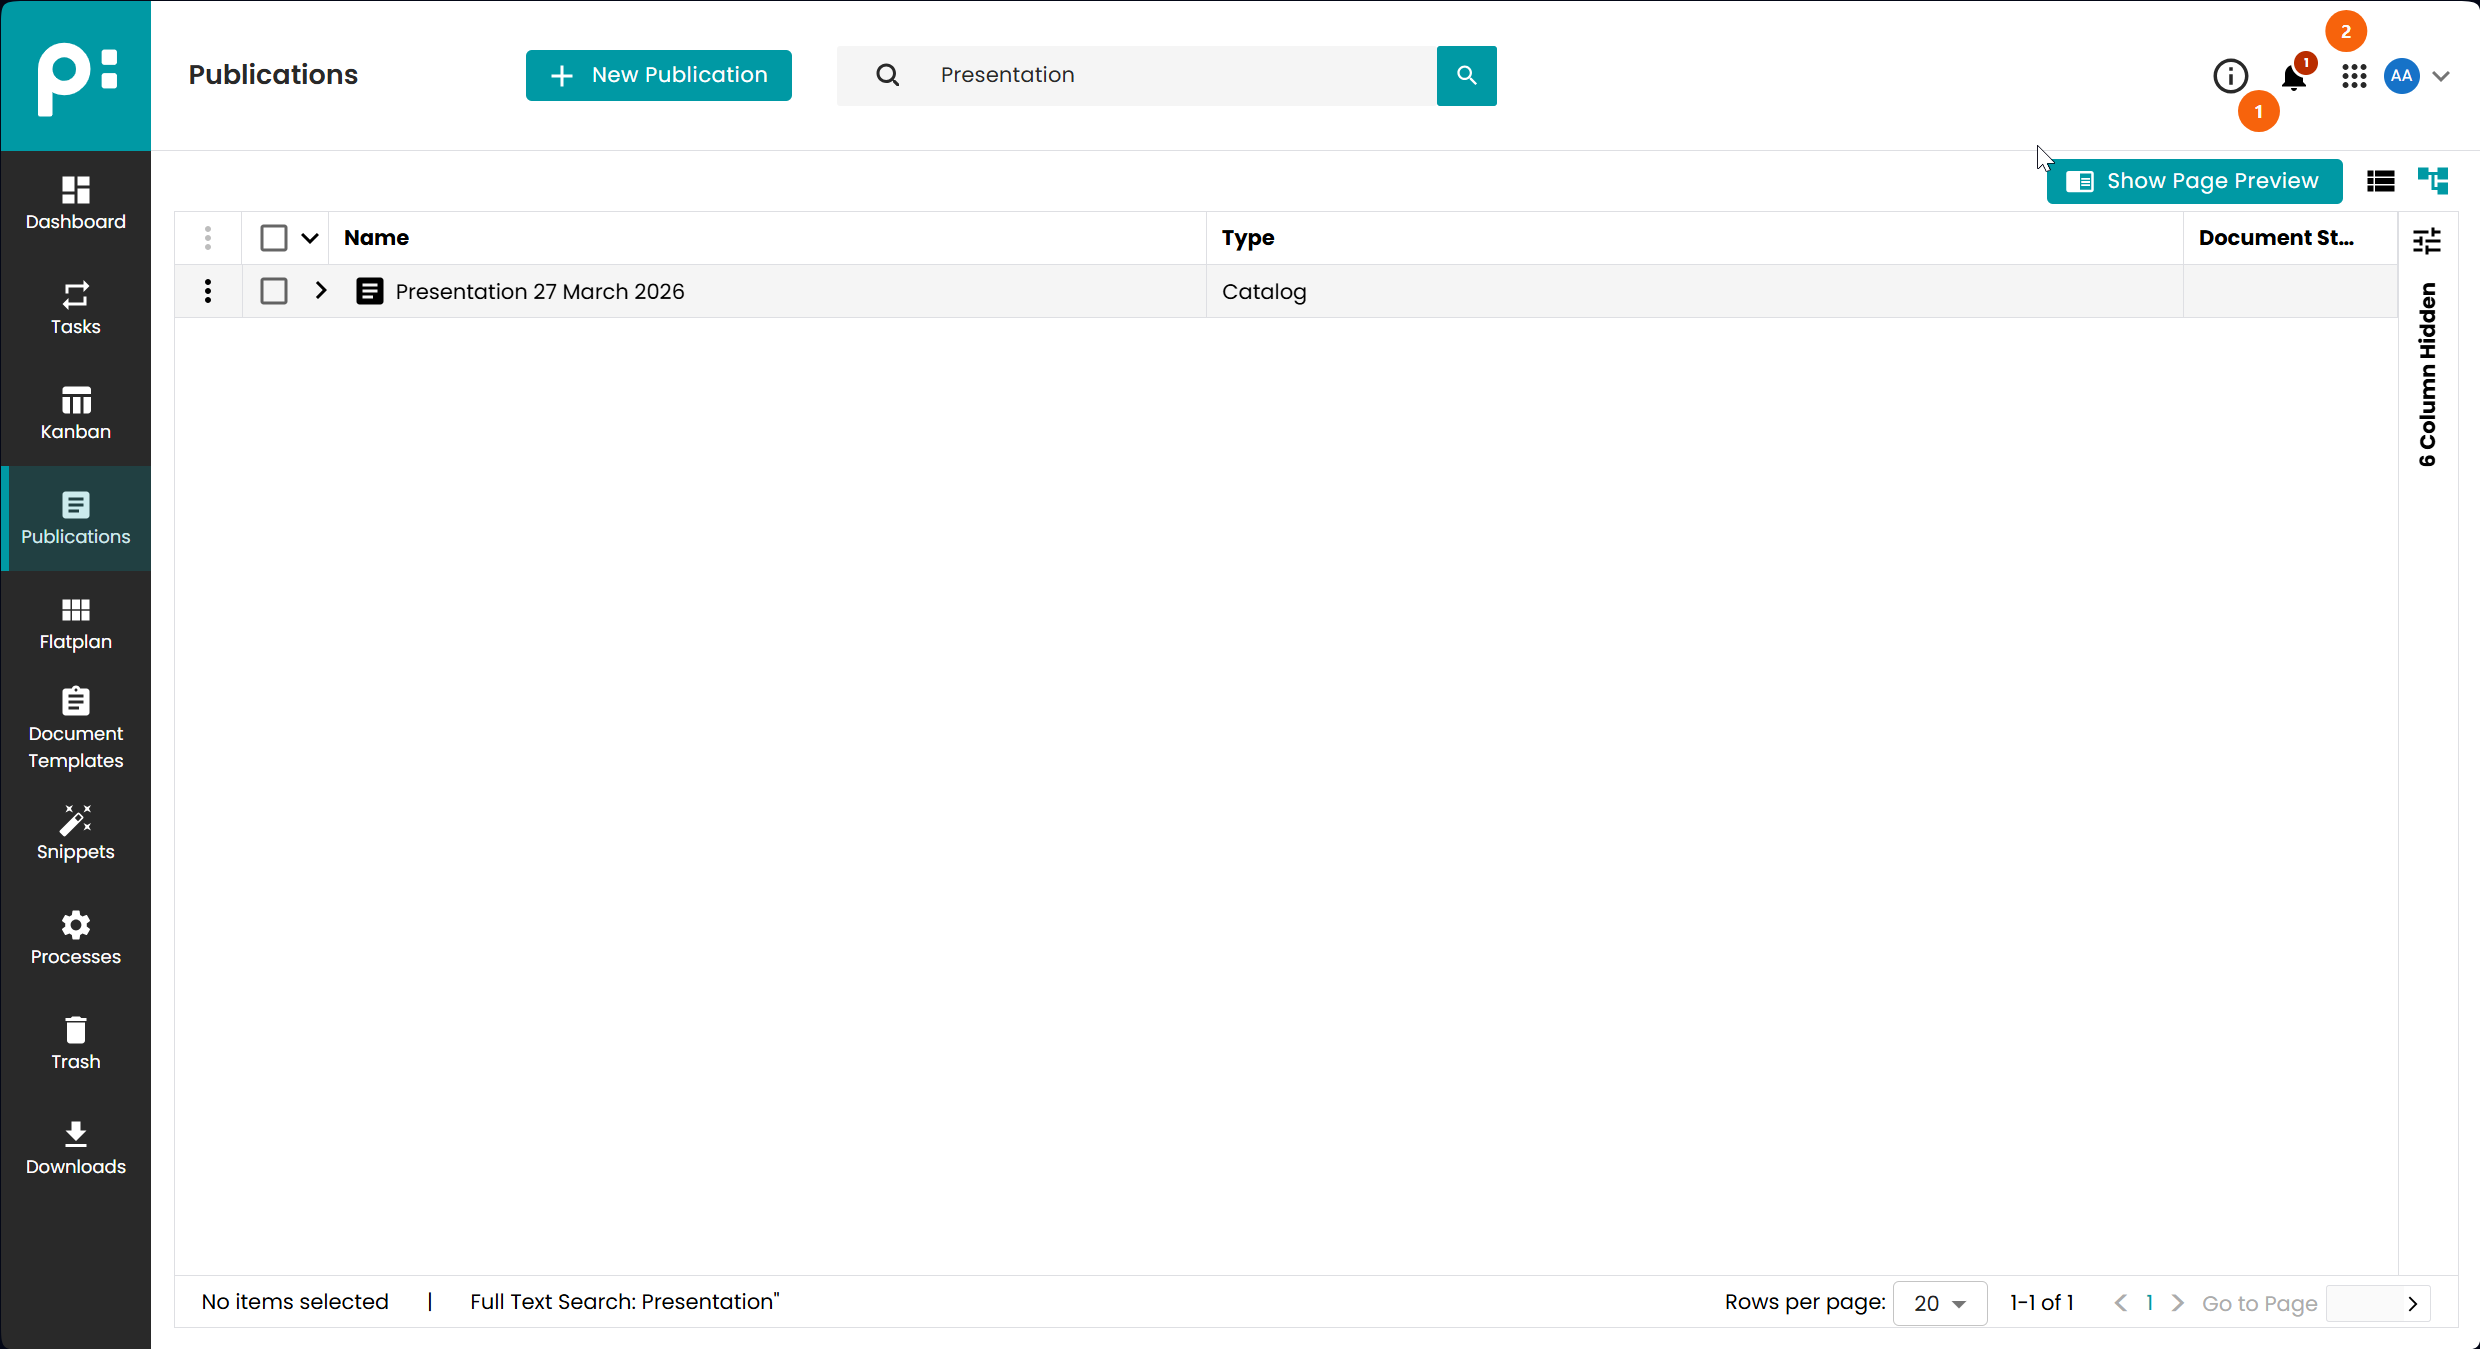
- The bell icon opens and closes the Message Center.
- A red badge on the bell shows the total number of unread messages across the User and General tabs.
If a detail panel is open when the Message Center is opened, that panel is temporarily hidden. Closing the Message Center restores the previously open detail panel.
When the Message Center is open and there are unsaved changes in a compose form, closing the center displays a confirmation dialog to avoid accidental data loss.
2 Message Center Layout
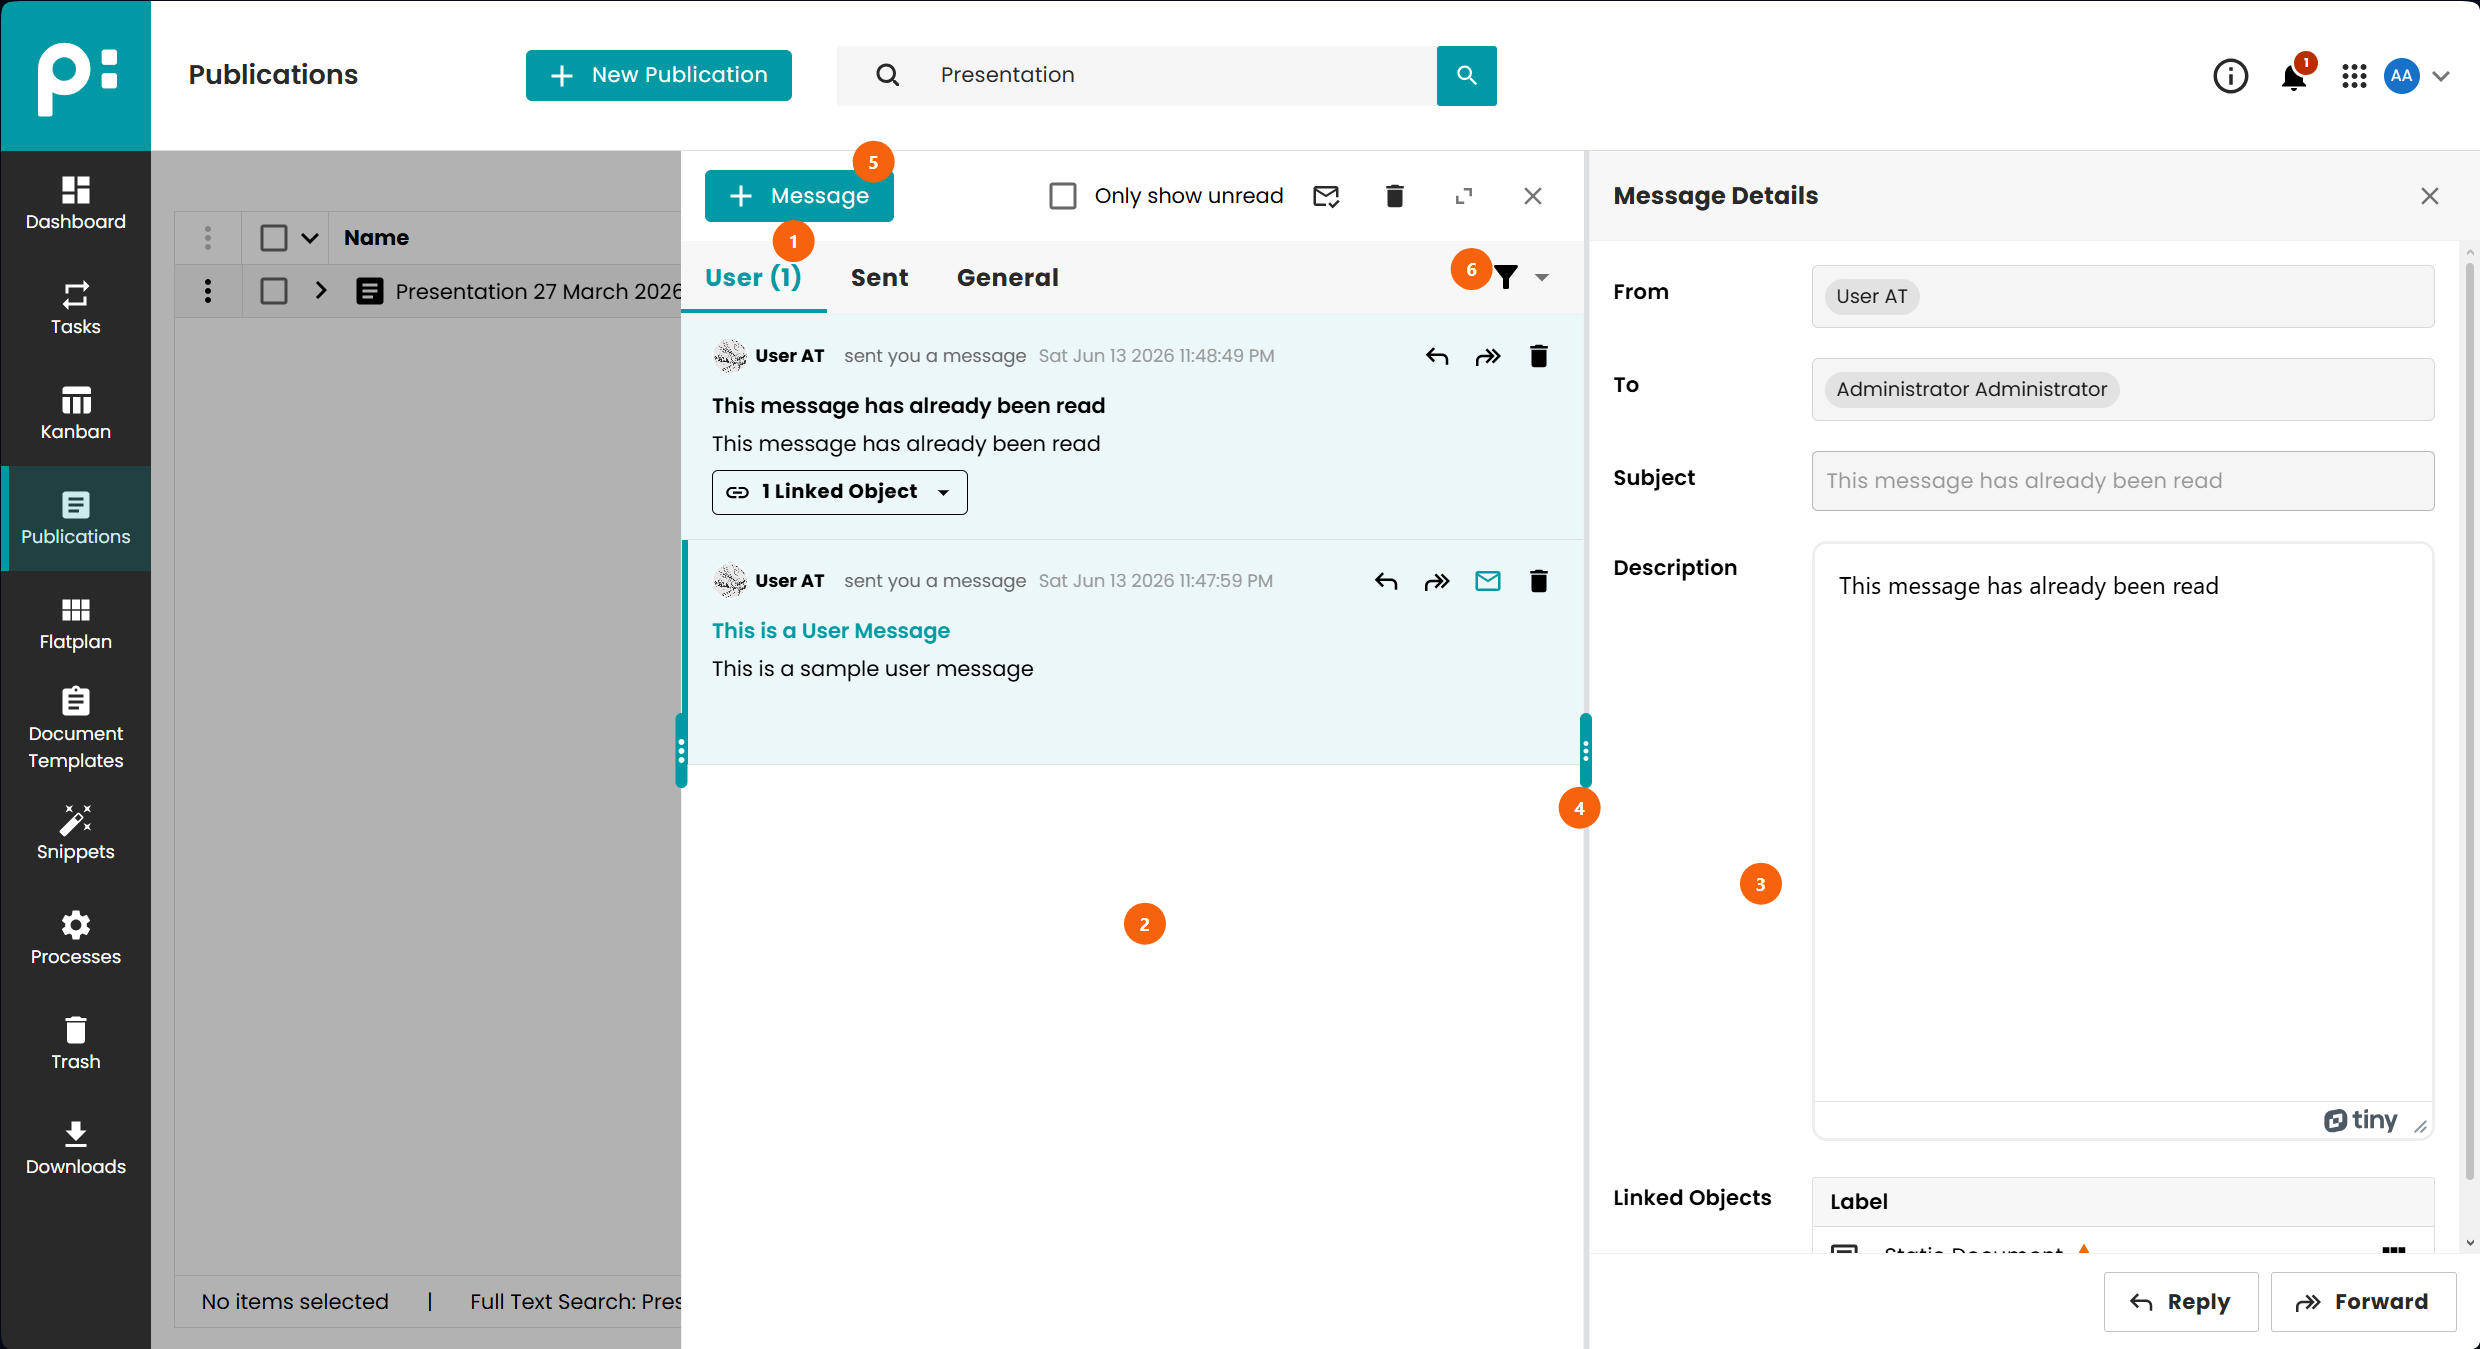
- The three tabs — User, Sent, and General — switch between inboxes. Each tab displays its own unread count badge.
- The left pane shows the message list for the active tab.
- The right pane shows the detail panel for the selected message, or the compose form when creating, replying to, or forwarding a message.
- A resizable divider separates the two panes.
- The Message button opens the form for writing a new direct message.
- Filter controls for narrowing the displayed messages (see section 5).
3 User Tab
The User tab is the personal inbox. It contains direct messages sent by other users and annotation notifications generated when the current user is mentioned in a note comment in the Review stage or when somebody replies to a note created by the user.
3.1 Message List
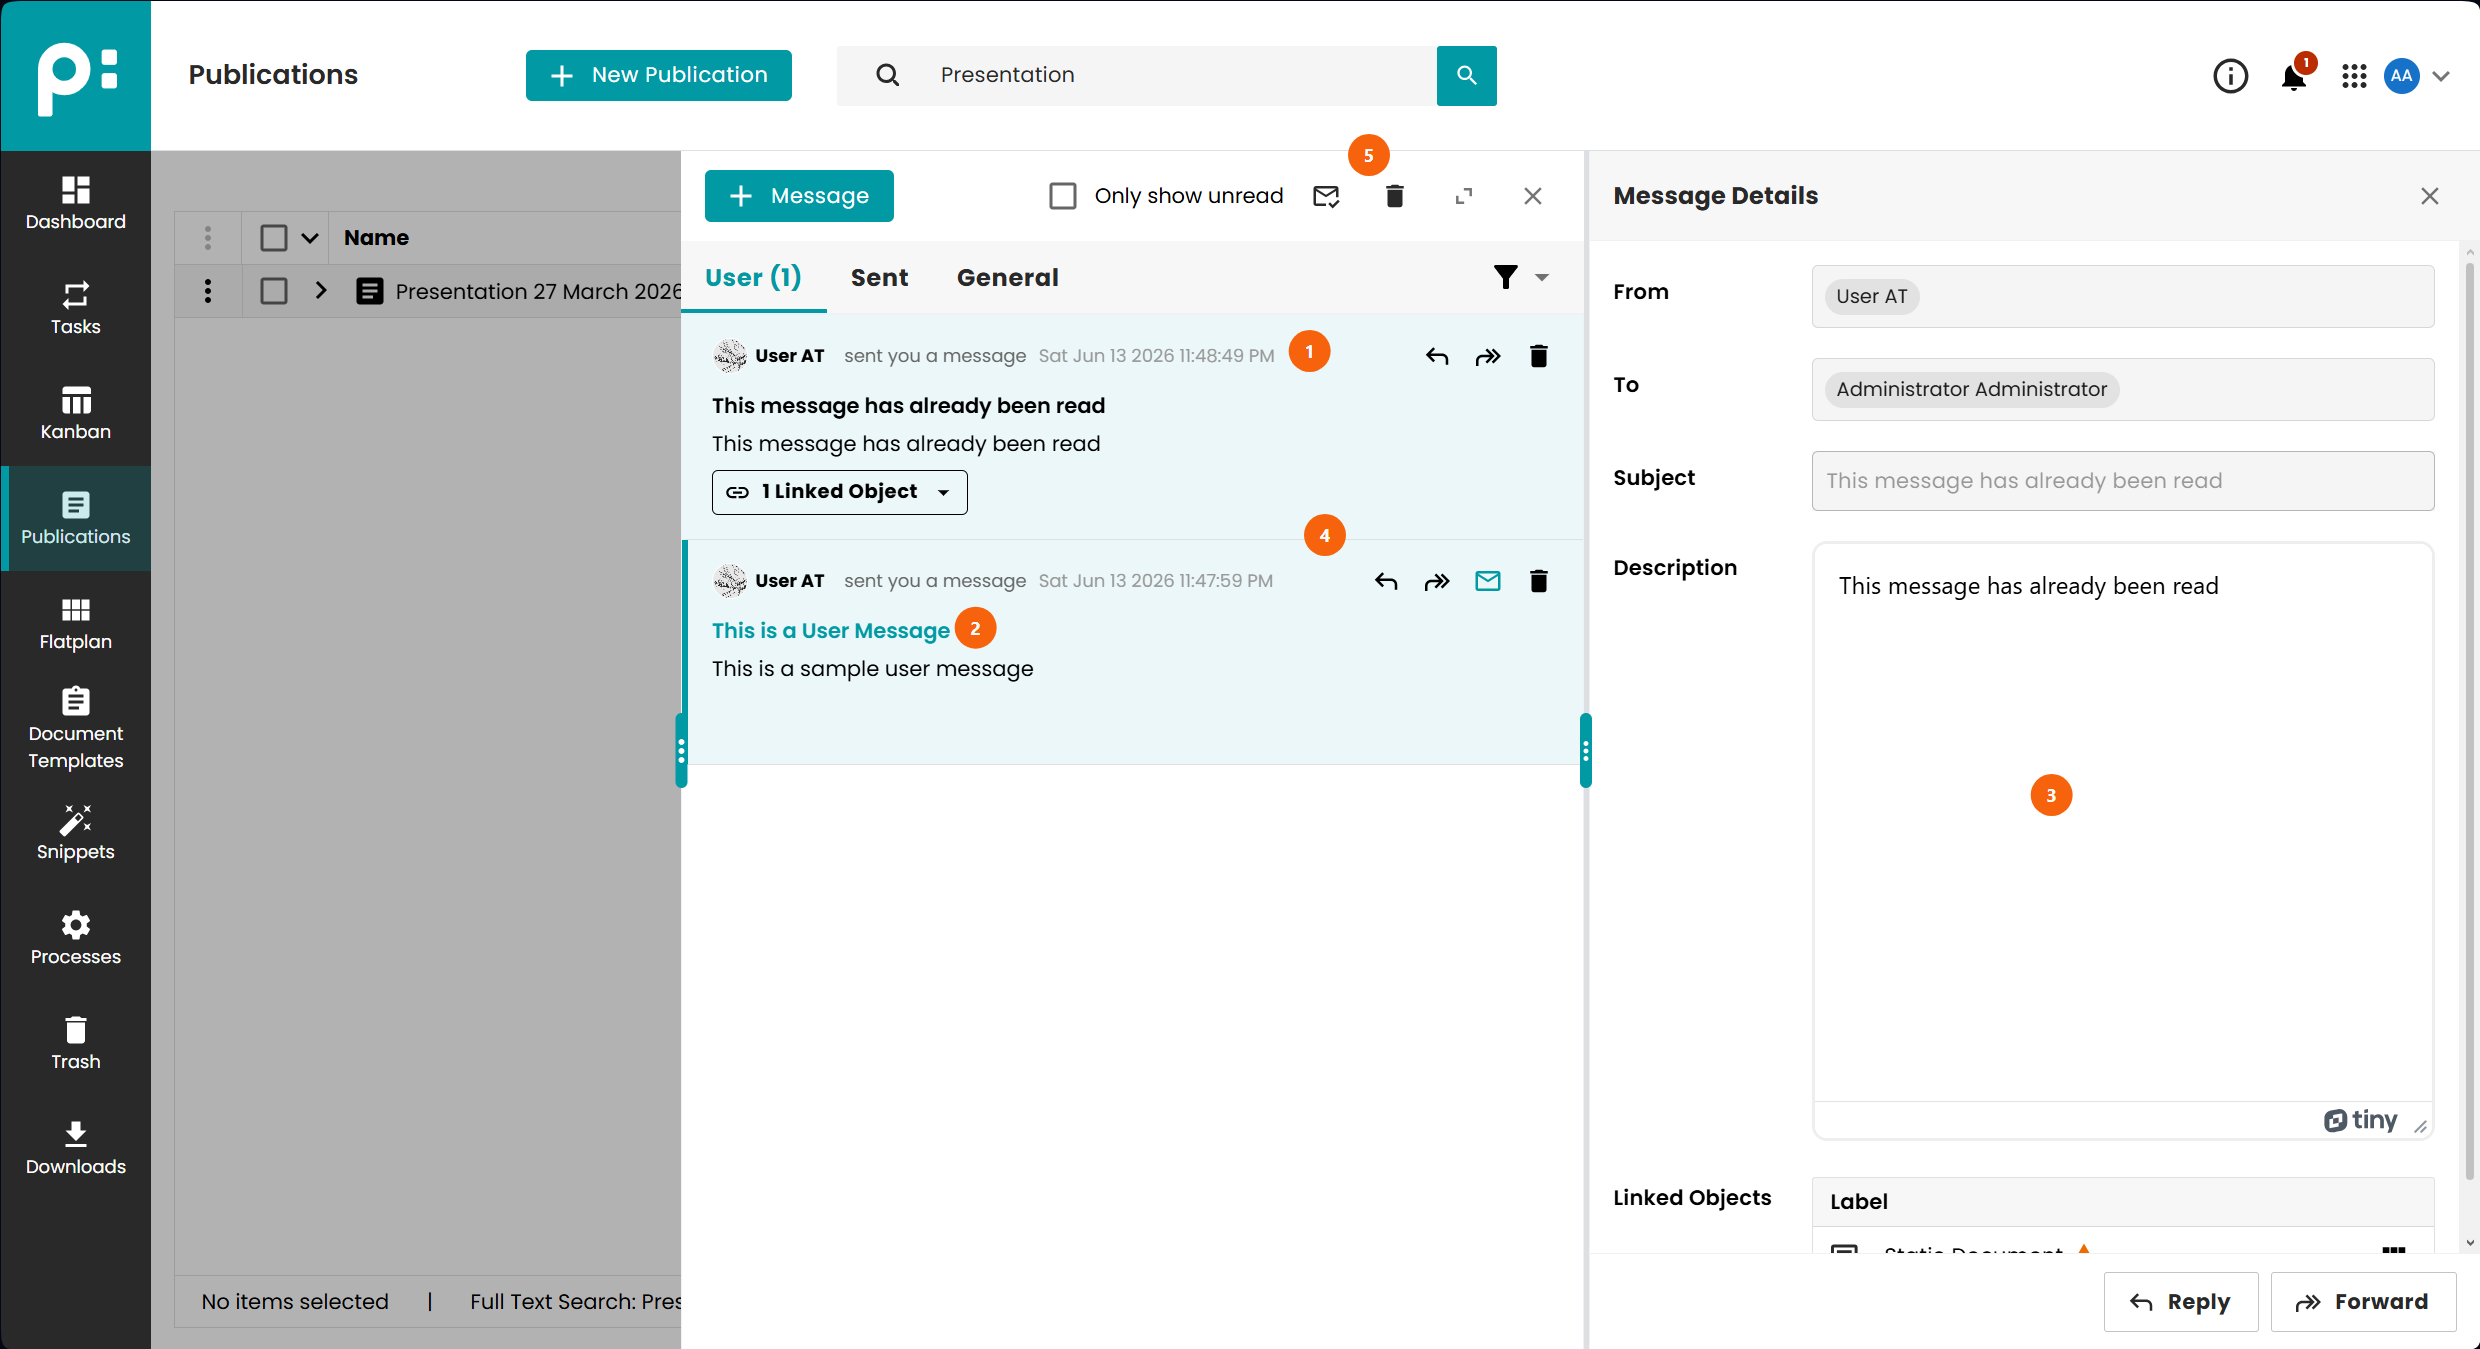
- Each row displays the sender's avatar, name, subject, a short content preview, and the received timestamp.
- Unread messages are highlighted with a bold font and a coloured indicator.
- Clicking a row selects it and loads the full message in the detail pane.
- Multiple messages can be selected. Holding Shift and clicking extends the selection to a range. Ctrl clicking is also supported.
- The selection toolbar appears above the list and provides bulk actions: Mark all messages as read and Delete.
3.2 Message Types
| Type | Description |
|---|---|
| Message | A direct message written by another user. |
| Annotation | A notification created when the current user is mentioned in a note comment in the Flatplan Review stage. |
| Note Assign | A notification sent when a note in the Review stage is assigned to the current user. |
| Note Unassign | A notification sent when the current user is removed as an assignee of a note. |
| Note Reply | A notification sent when another user replies to a note created by the current user. |
3.3 Message Detail Panel
Selecting a message from the list opens its full content in the right pane.
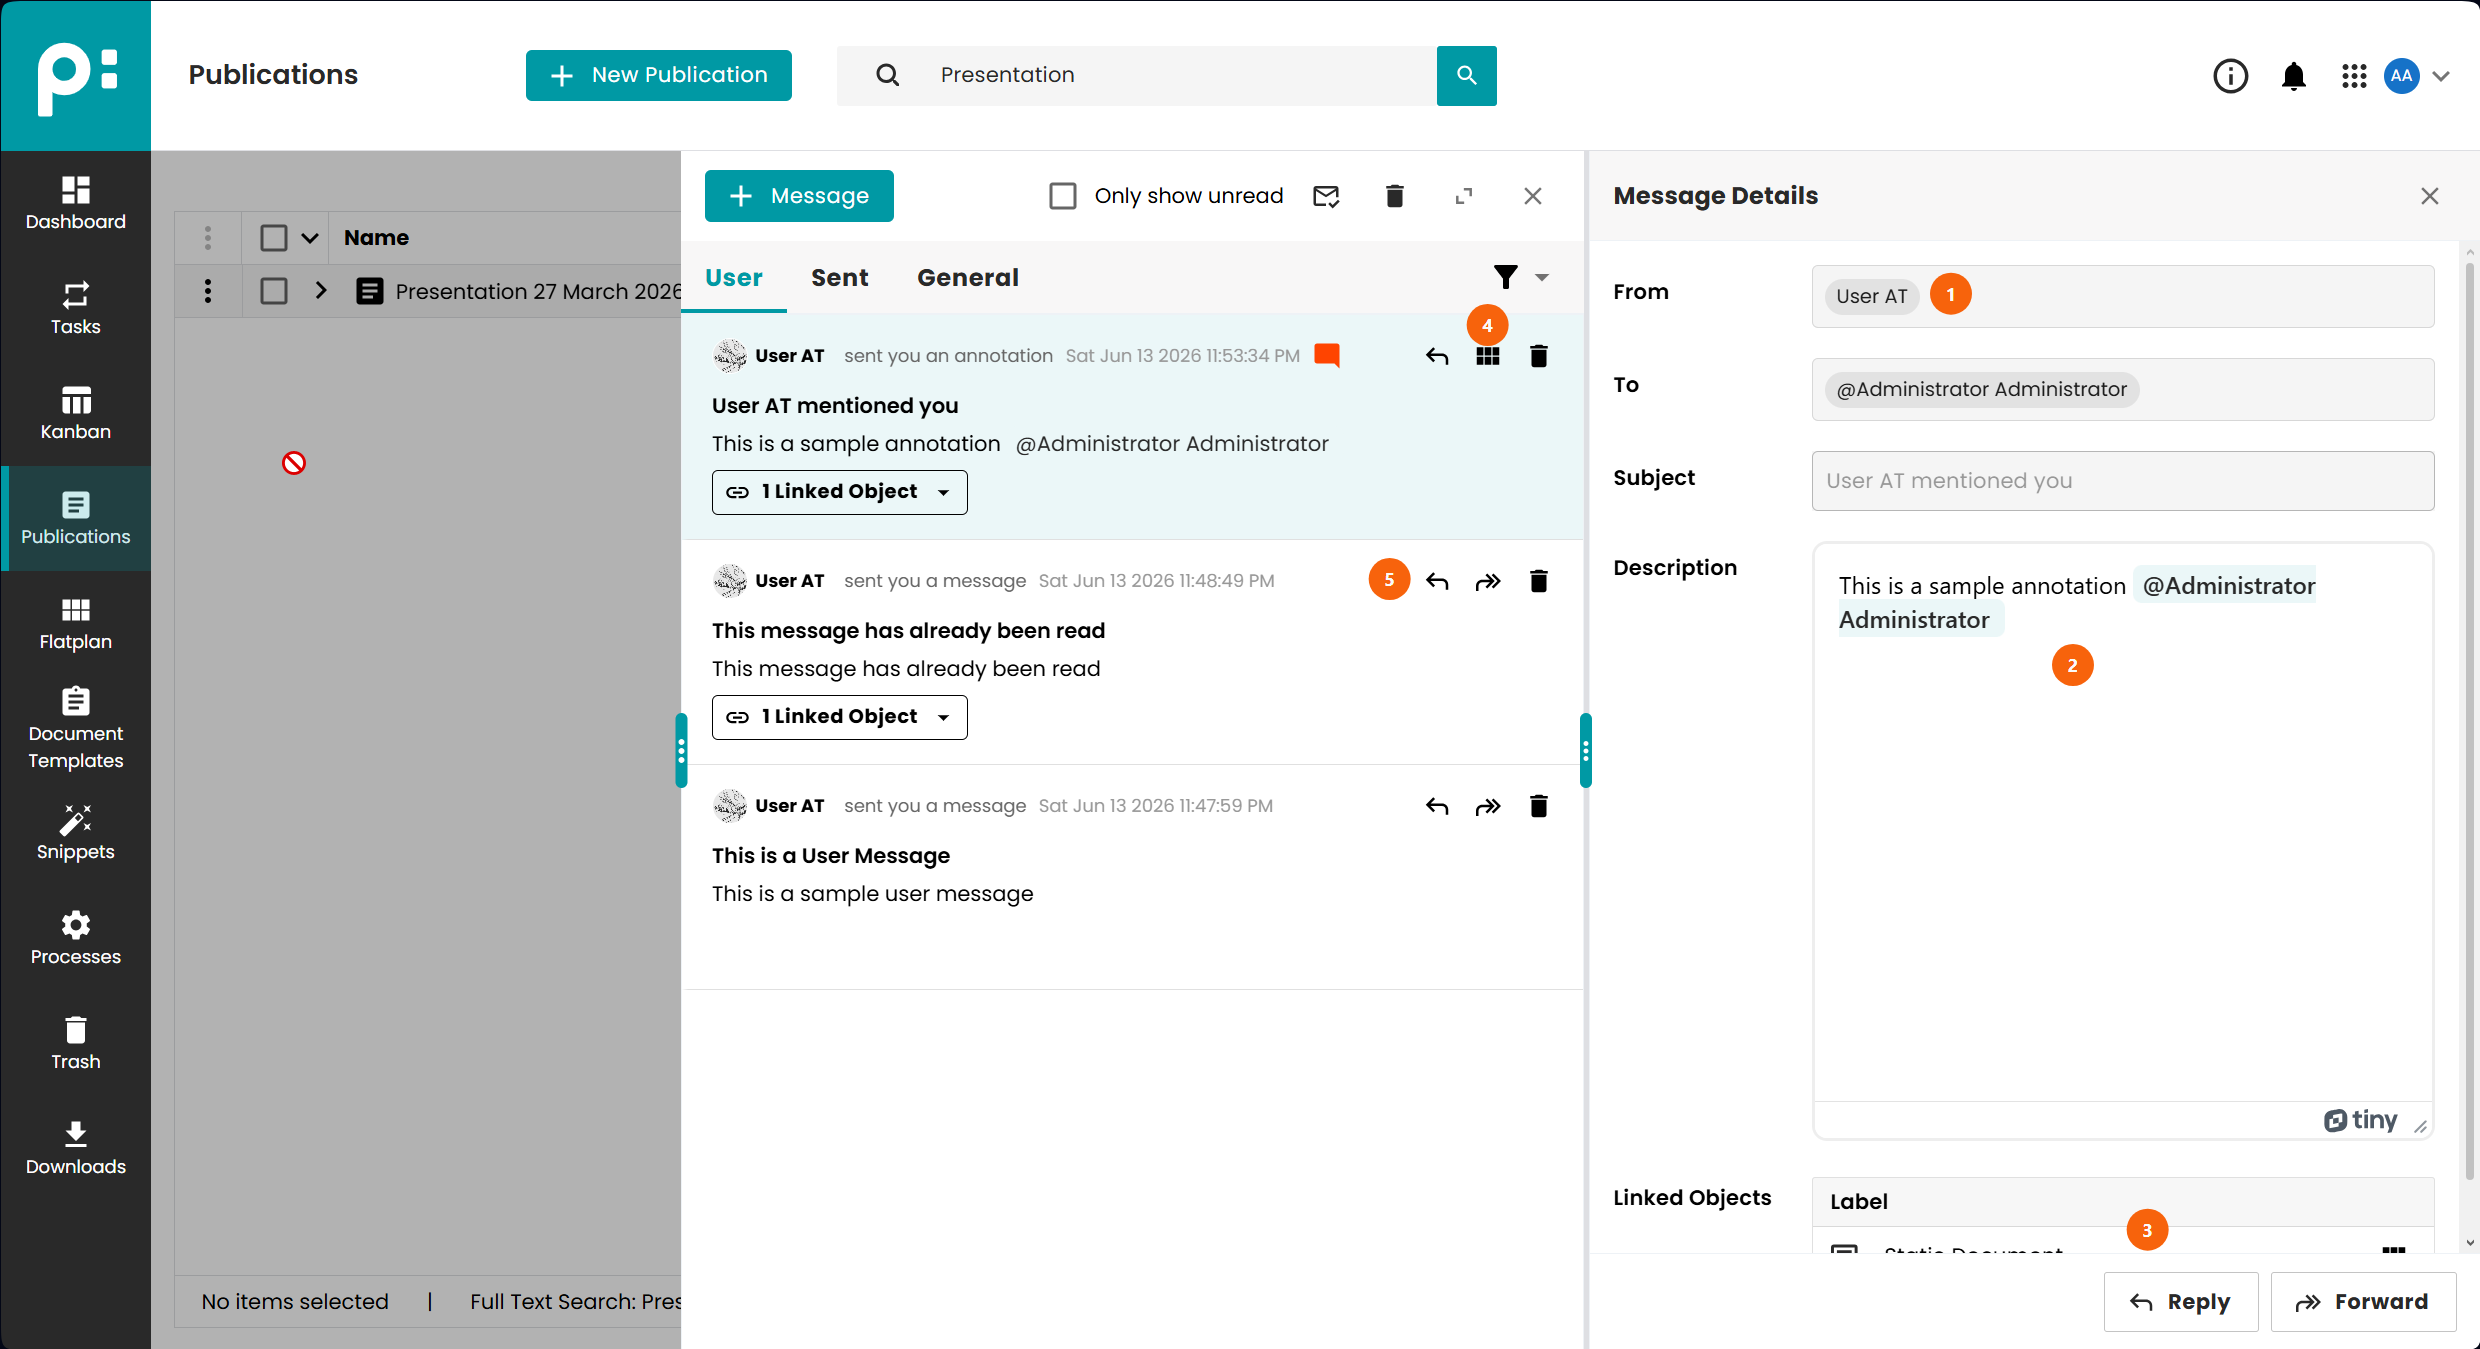
- The sender name, avatar, and timestamp are shown at the top.
- The full message content is displayed in the body.
- Linked documents or publications attached to the message are listed below the content. Clicking a document link opens it in the Flatplan editor.
- For Annotation messages, a button is shown to navigate directly to the spread in the Flatplan Review stage where the referenced note is located. If the note has been deleted since the annotation was sent, this is indicated.
- The action toolbar provides buttons for Reply, Forward, and Delete.
Clicking away from the message or selecting another message marks the viewed message as read automatically.
3.4 Annotations from Note Mentions
When working in the Flatplan Review stage, users can mention colleagues in note comments by typing @ in the note text followed by the user or team name. Each mentioned user receives an Annotation notification in their User tab inbox. The notification includes:
- A preview of the note comment.
- A link to the document that contains the note.
- A button to jump directly to the note in the Review stage.
This allows reviewers to draw attention to specific pages or corrections without leaving the editorial workflow.
4 Sent Tab
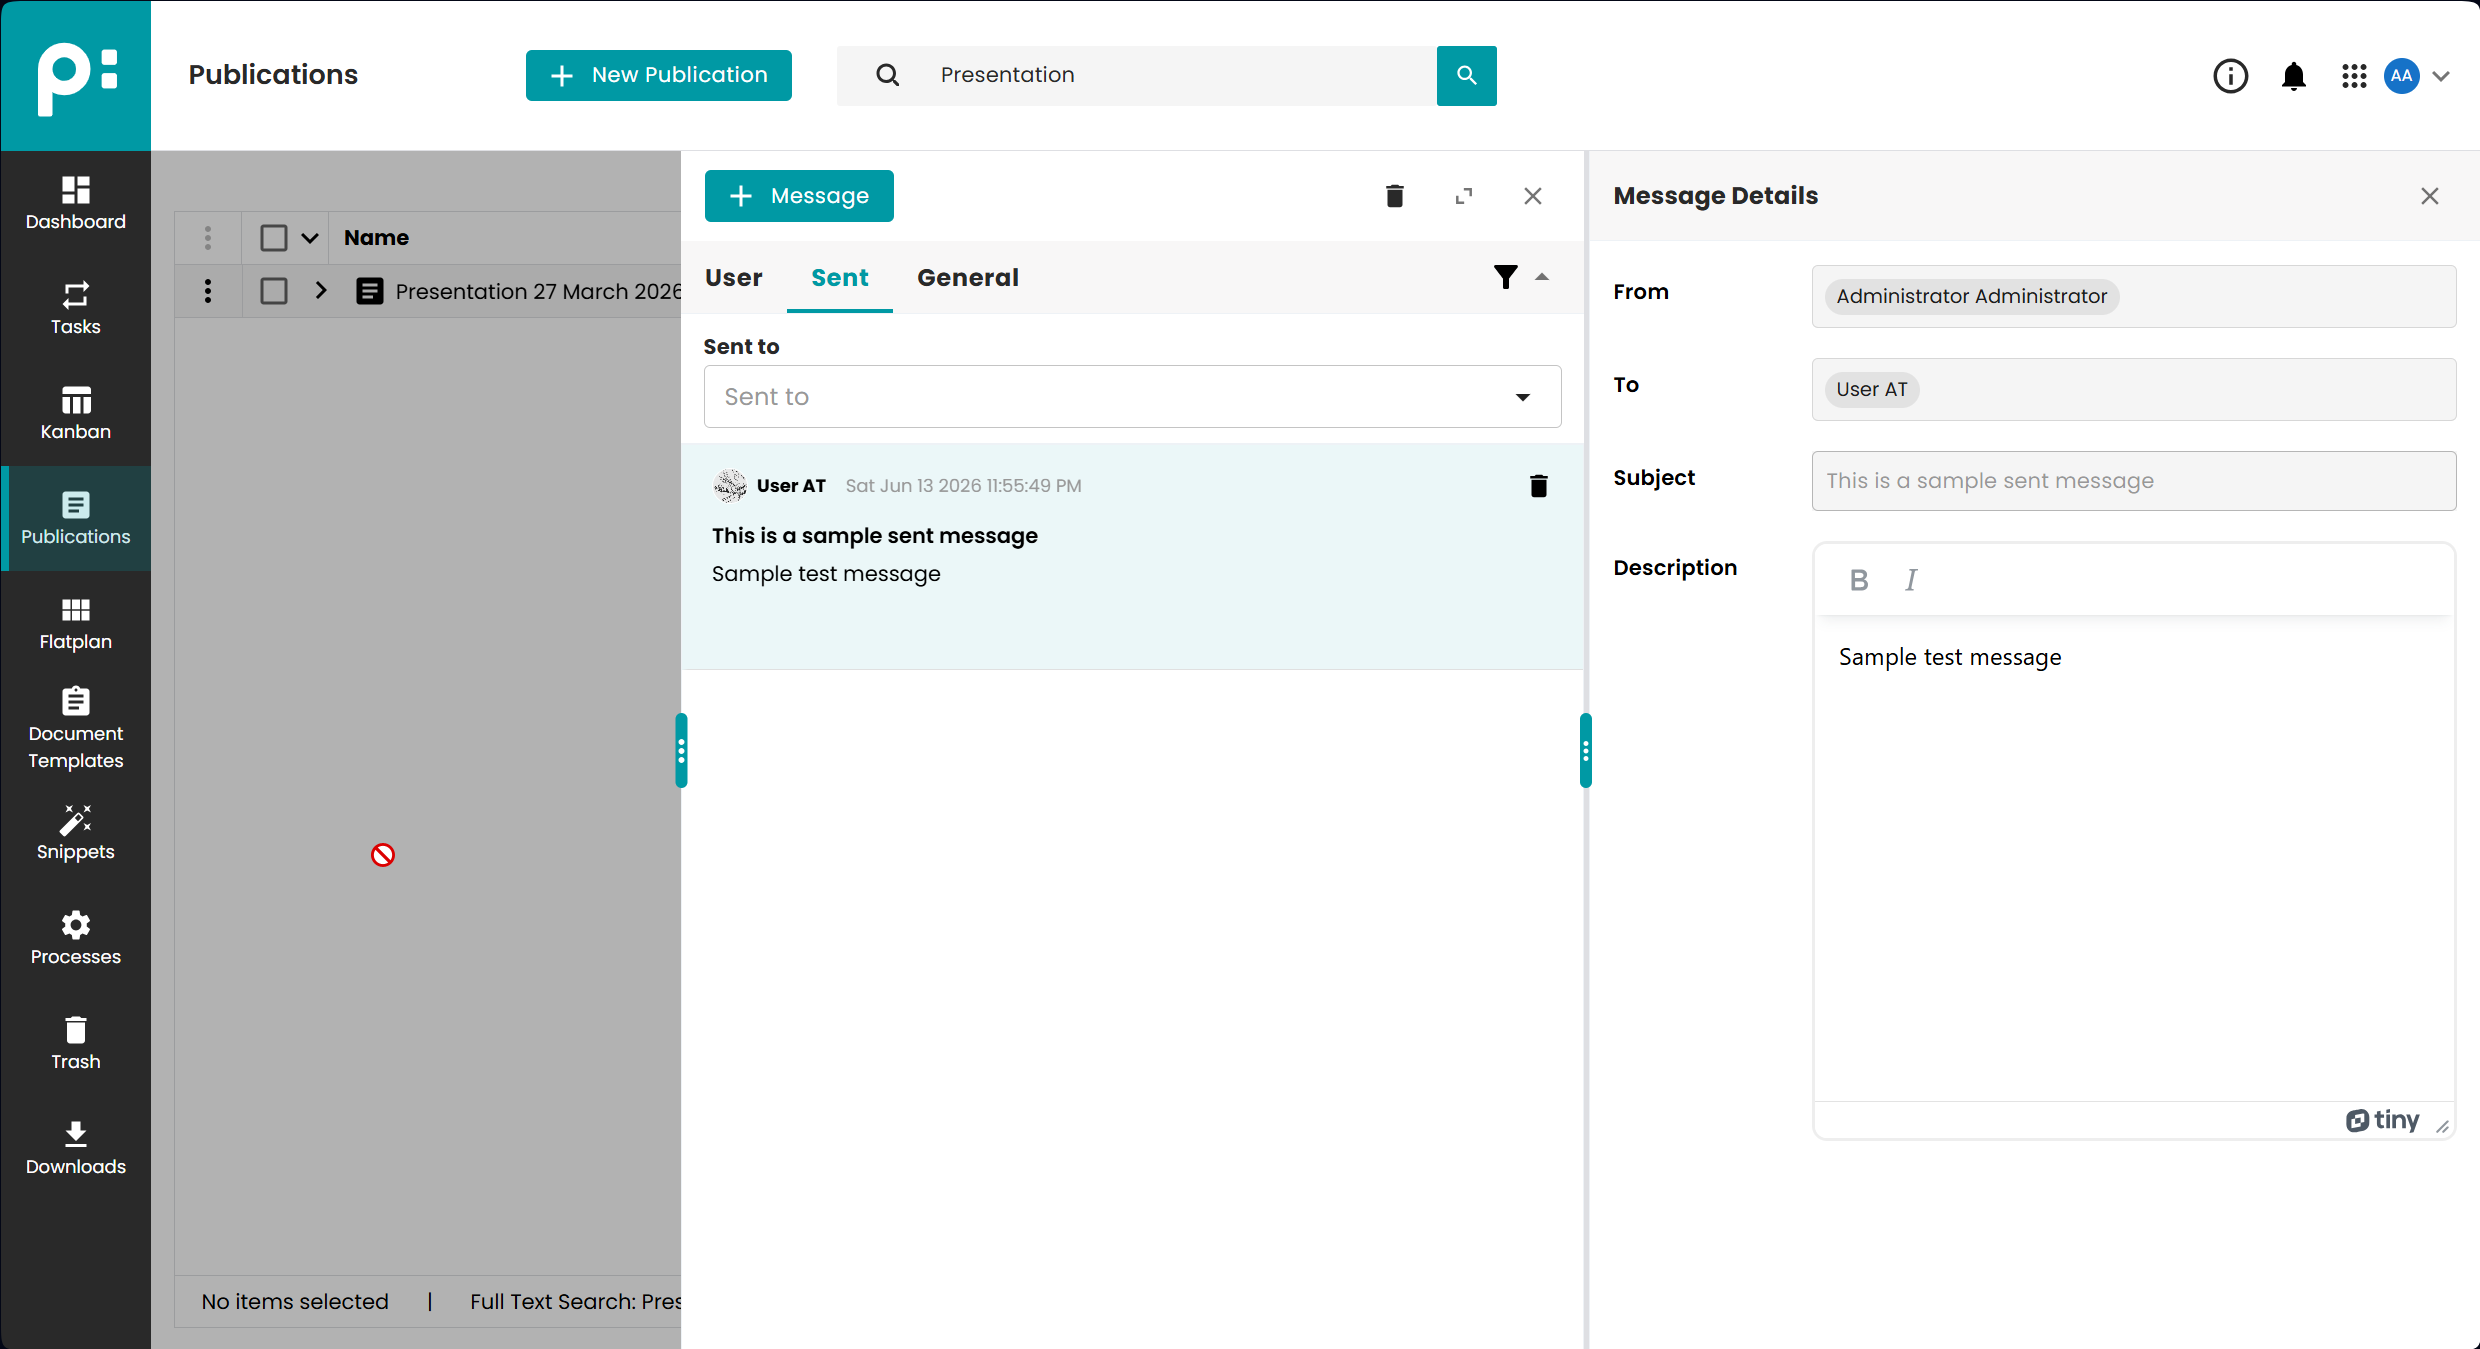
The Sent tab displays all direct messages sent by the current user.
4.1 Sent Message List
- Each row shows the recipient(s), subject, a content preview, and the sent timestamp.
- Selecting a message opens the full sent message in the detail pane.
- Multiple messages can be selected and deleted in bulk using the selection toolbar.
4.2 Sent Message Detail Panel
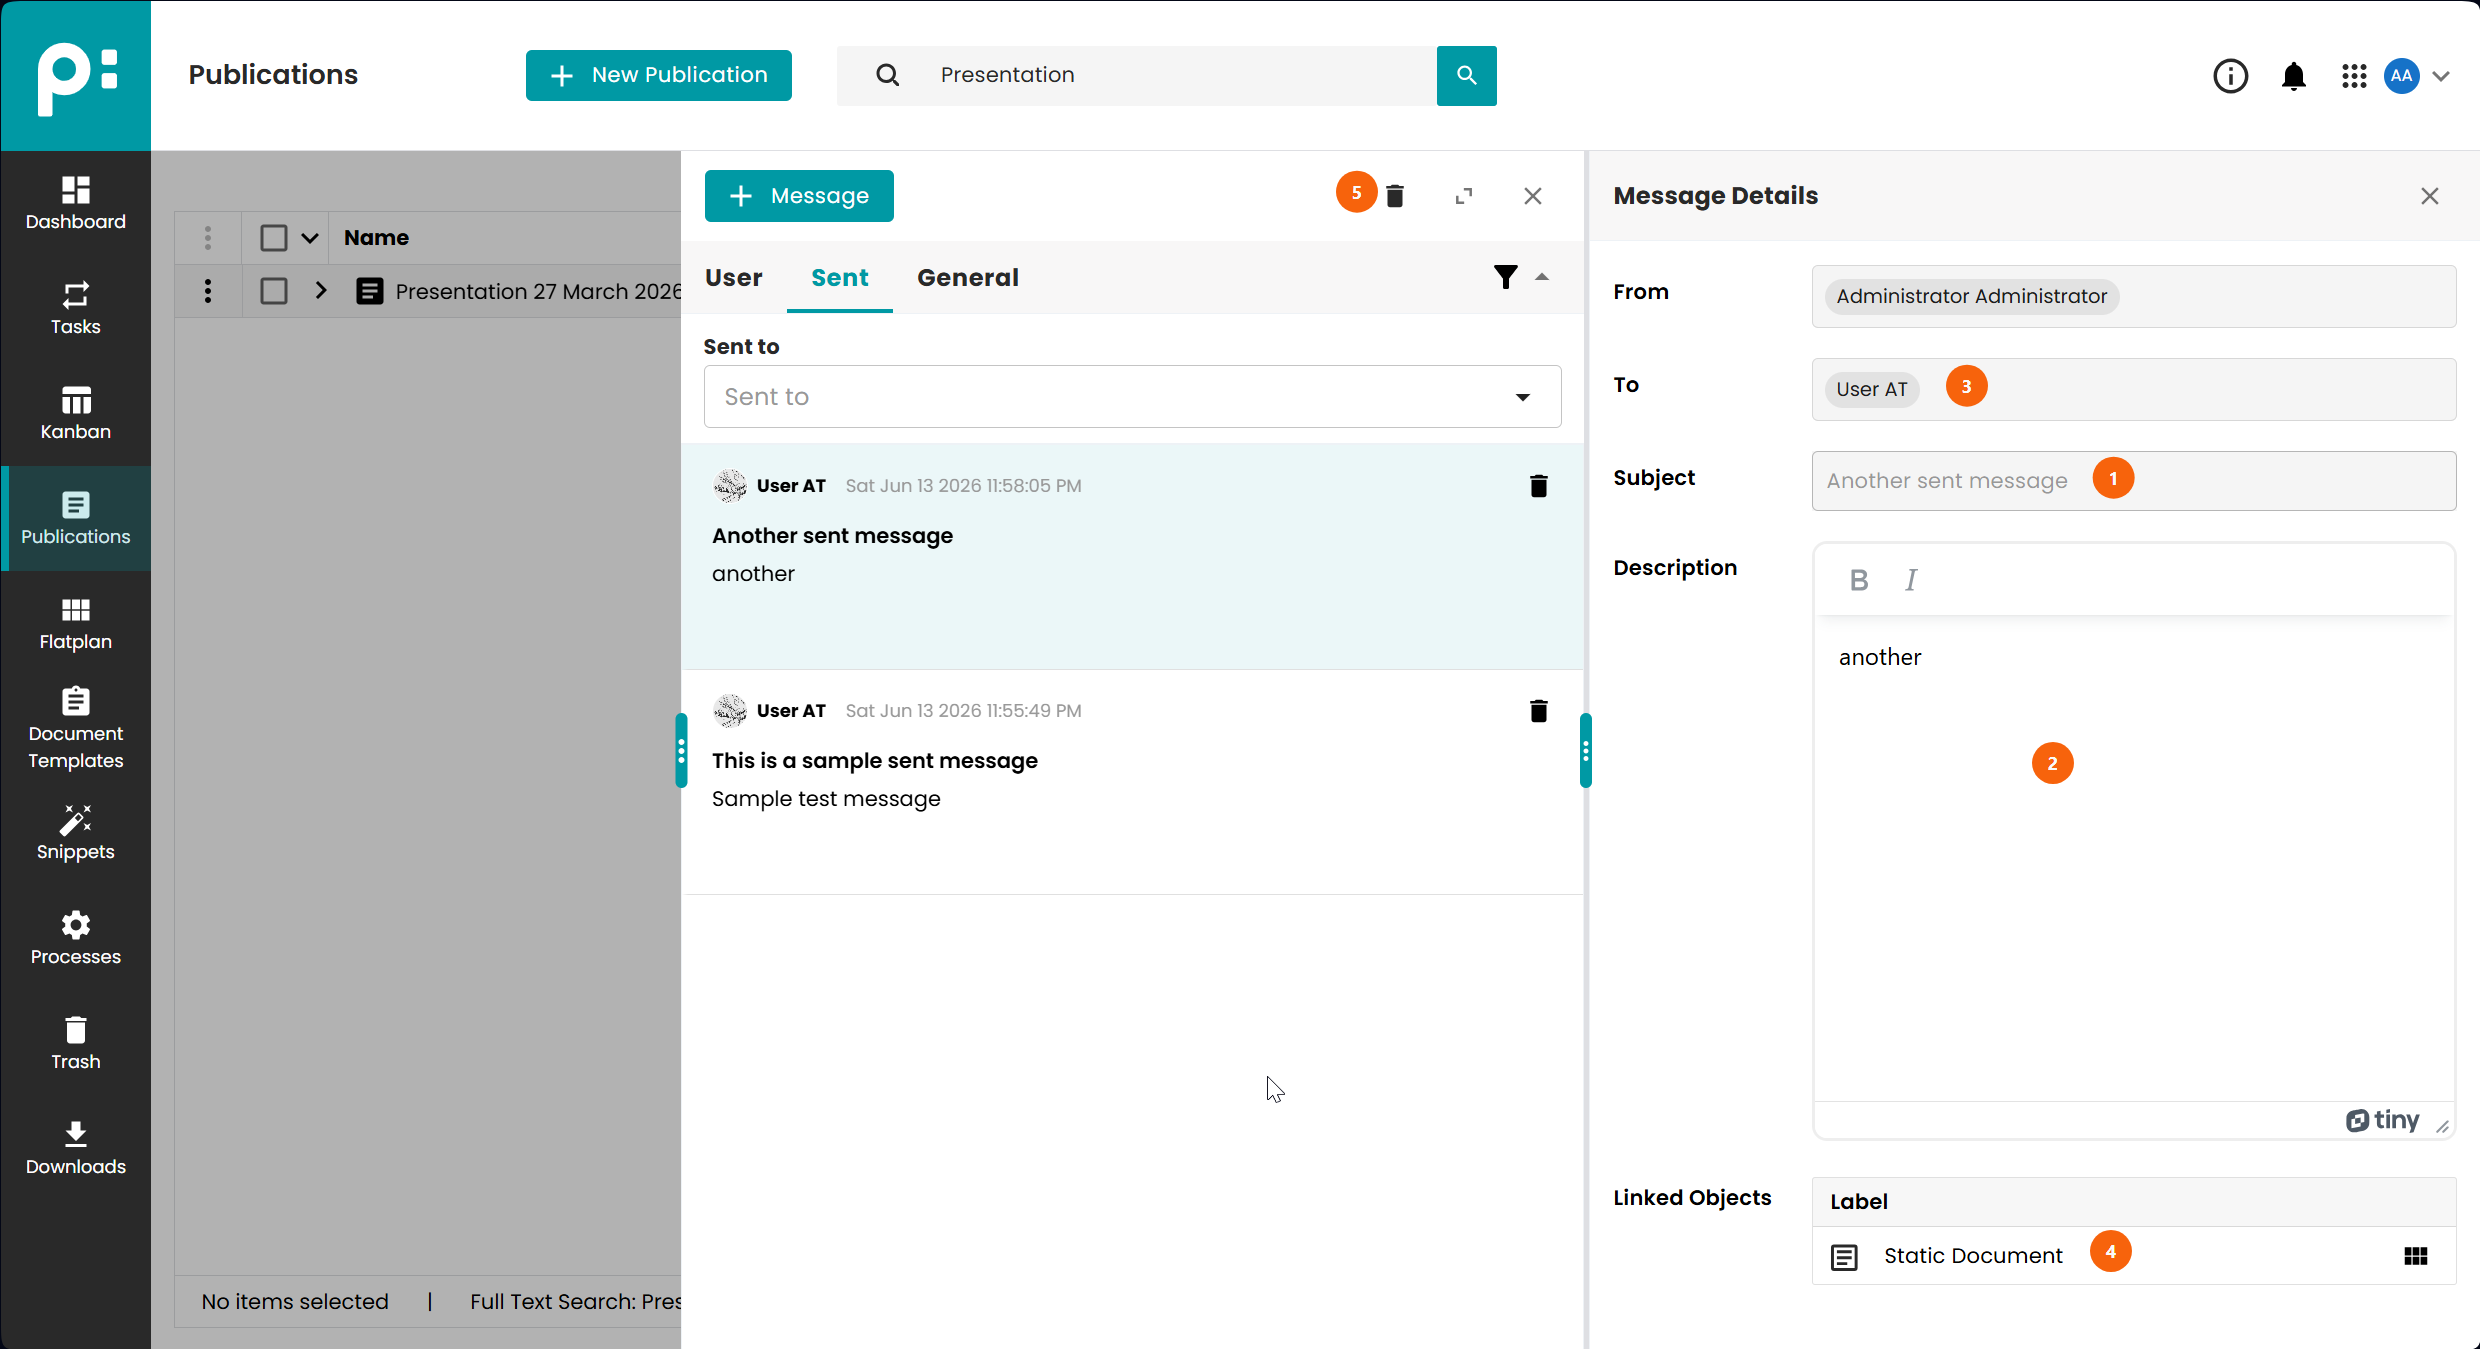
- The subject is shown at the top.
- The full content of the sent message is displayed.
- The Recipients section lists all users and teams the message was sent to.
- Linked documents or publications are shown below the recipient list.
- The Delete action removes the sent message from the Sent tab. This does not delete the message from recipients' inboxes.
5 General Tab
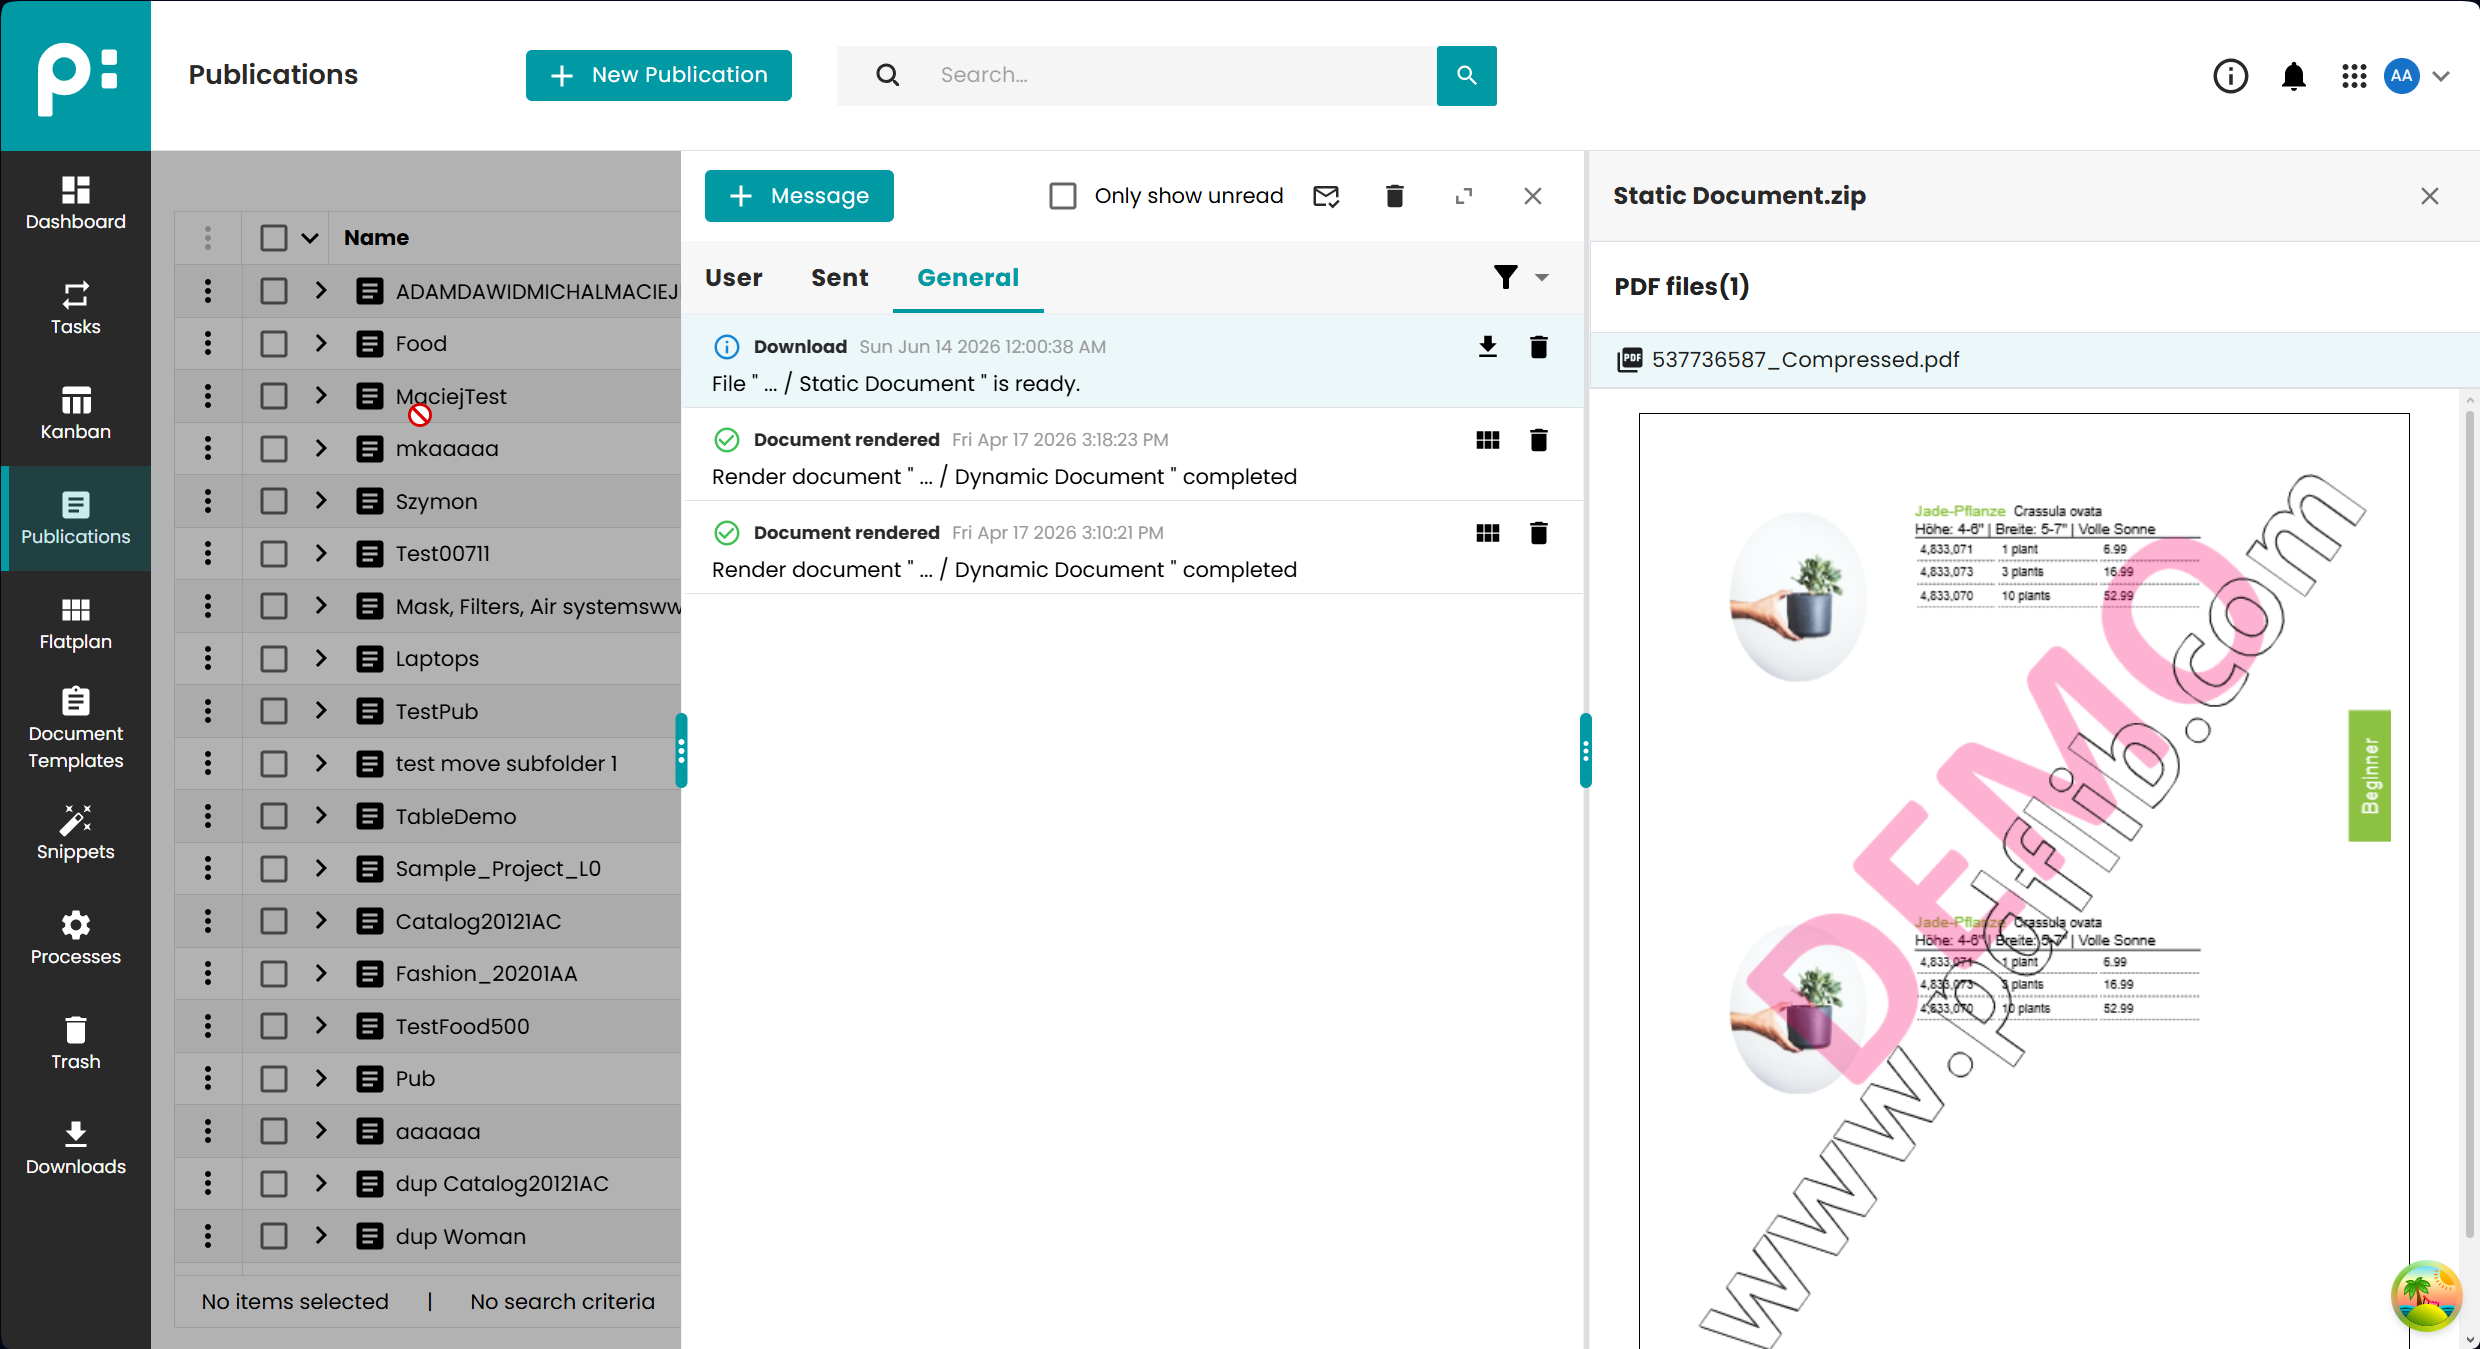
The General tab contains system-generated notifications related to background processes, user task assignments, and download results. These messages are not sent by users but are produced automatically by the system.
5.1 General Message List
- Each row displays the notification type icon, a summary, and the timestamp.
- Unread notifications are highlighted.
- Selecting a notification opens its detail content in the right pane.
- Multiple notifications can be selected and deleted in bulk.
5.2 General Message Types
| Type | Description |
|---|---|
| Info | Informational updates about ongoing operations. |
| Success | Confirmation that a background process completed successfully. |
| Warning | A process completed with warnings that may require attention. |
| Error | A process failed and requires the user to take action. |
5.3 General Message Detail Panel
The detail panel for general notifications adapts to the notification type.
- Process notifications show the process name, the associated object (document, publication, or folder), and the result status.
- User task notifications show the task details and provide a button to open the task directly in the task management interface.
- Download notifications show the result of a PDF delivery or export process and provide a button to download the generated file.
For notifications linked to a document or publication, a button is available to navigate directly to that object in the Flatplan or Publications view.
6 Creating a Message
New direct messages can be written by clicking the Message button in the top-left area of the Message Center.
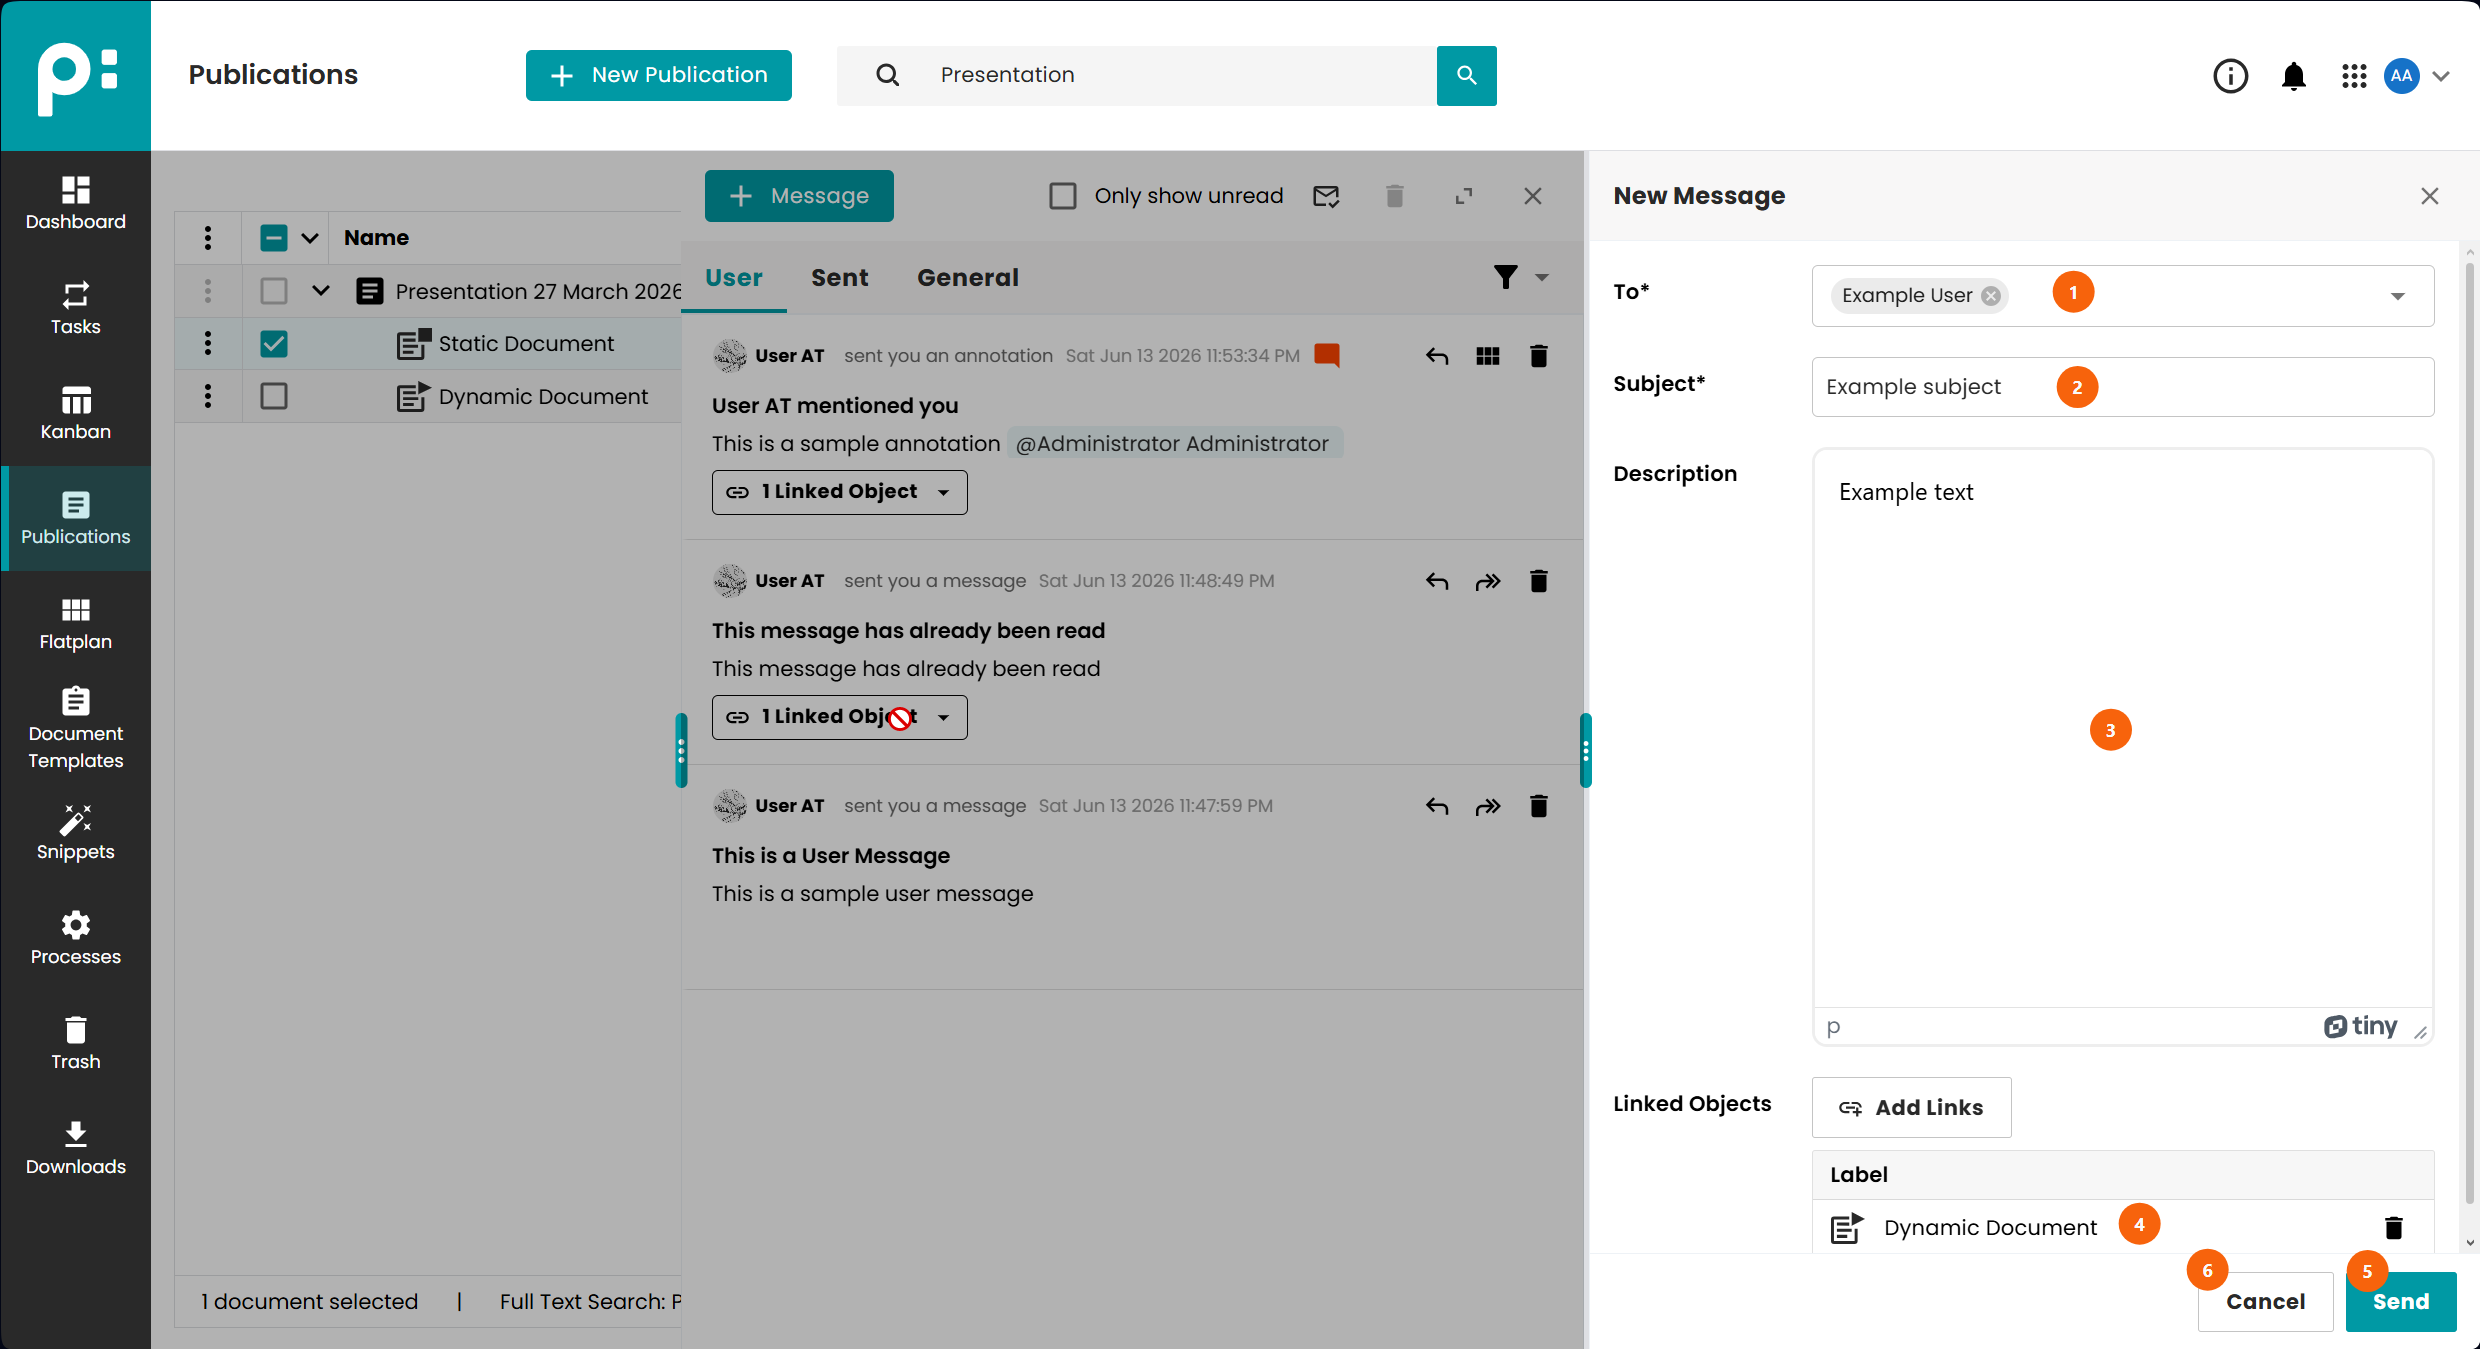
- To — Select one or more recipients. Both individual users and teams can be selected. Typing filters the list.
- Subject — A short title for the message.
- Content — A rich text editor for the message body. Use
@to mention users or teams in the message. Mentioned users receive the message as a notification in their User tab in addition to the listed recipients. - Linked objects — Optionally attach one or more documents or publications to give the message context. Recipients can click the links to navigate to those objects.
- Send — Submits the message. The sent message appears in the Sent tab.
- Cancel — Discards the draft. If any content has been entered, a confirmation dialog is shown.
7 Replying and Forwarding
7.1 Reply
The Reply action is available in the message detail panel for messages of type Message and Annotation. Clicking it opens the reply form:
- The original sender is pre-filled as the recipient.
- The subject is pre-filled with
Re:followed by the original subject. - The original message content is quoted below the compose area.
- Additional recipients can be added.
7.2 Forward
The Forward action is available for messages of type Message. Clicking it opens the forward form:
- The subject is pre-filled with
Fwd:followed by the original subject. - The original message content is quoted below the compose area.
- Recipients must be entered manually.
- Linked objects from the original message are carried over.
8 Filtering Messages
Each tab has its own set of filters that persist independently between tab switches within the same session.
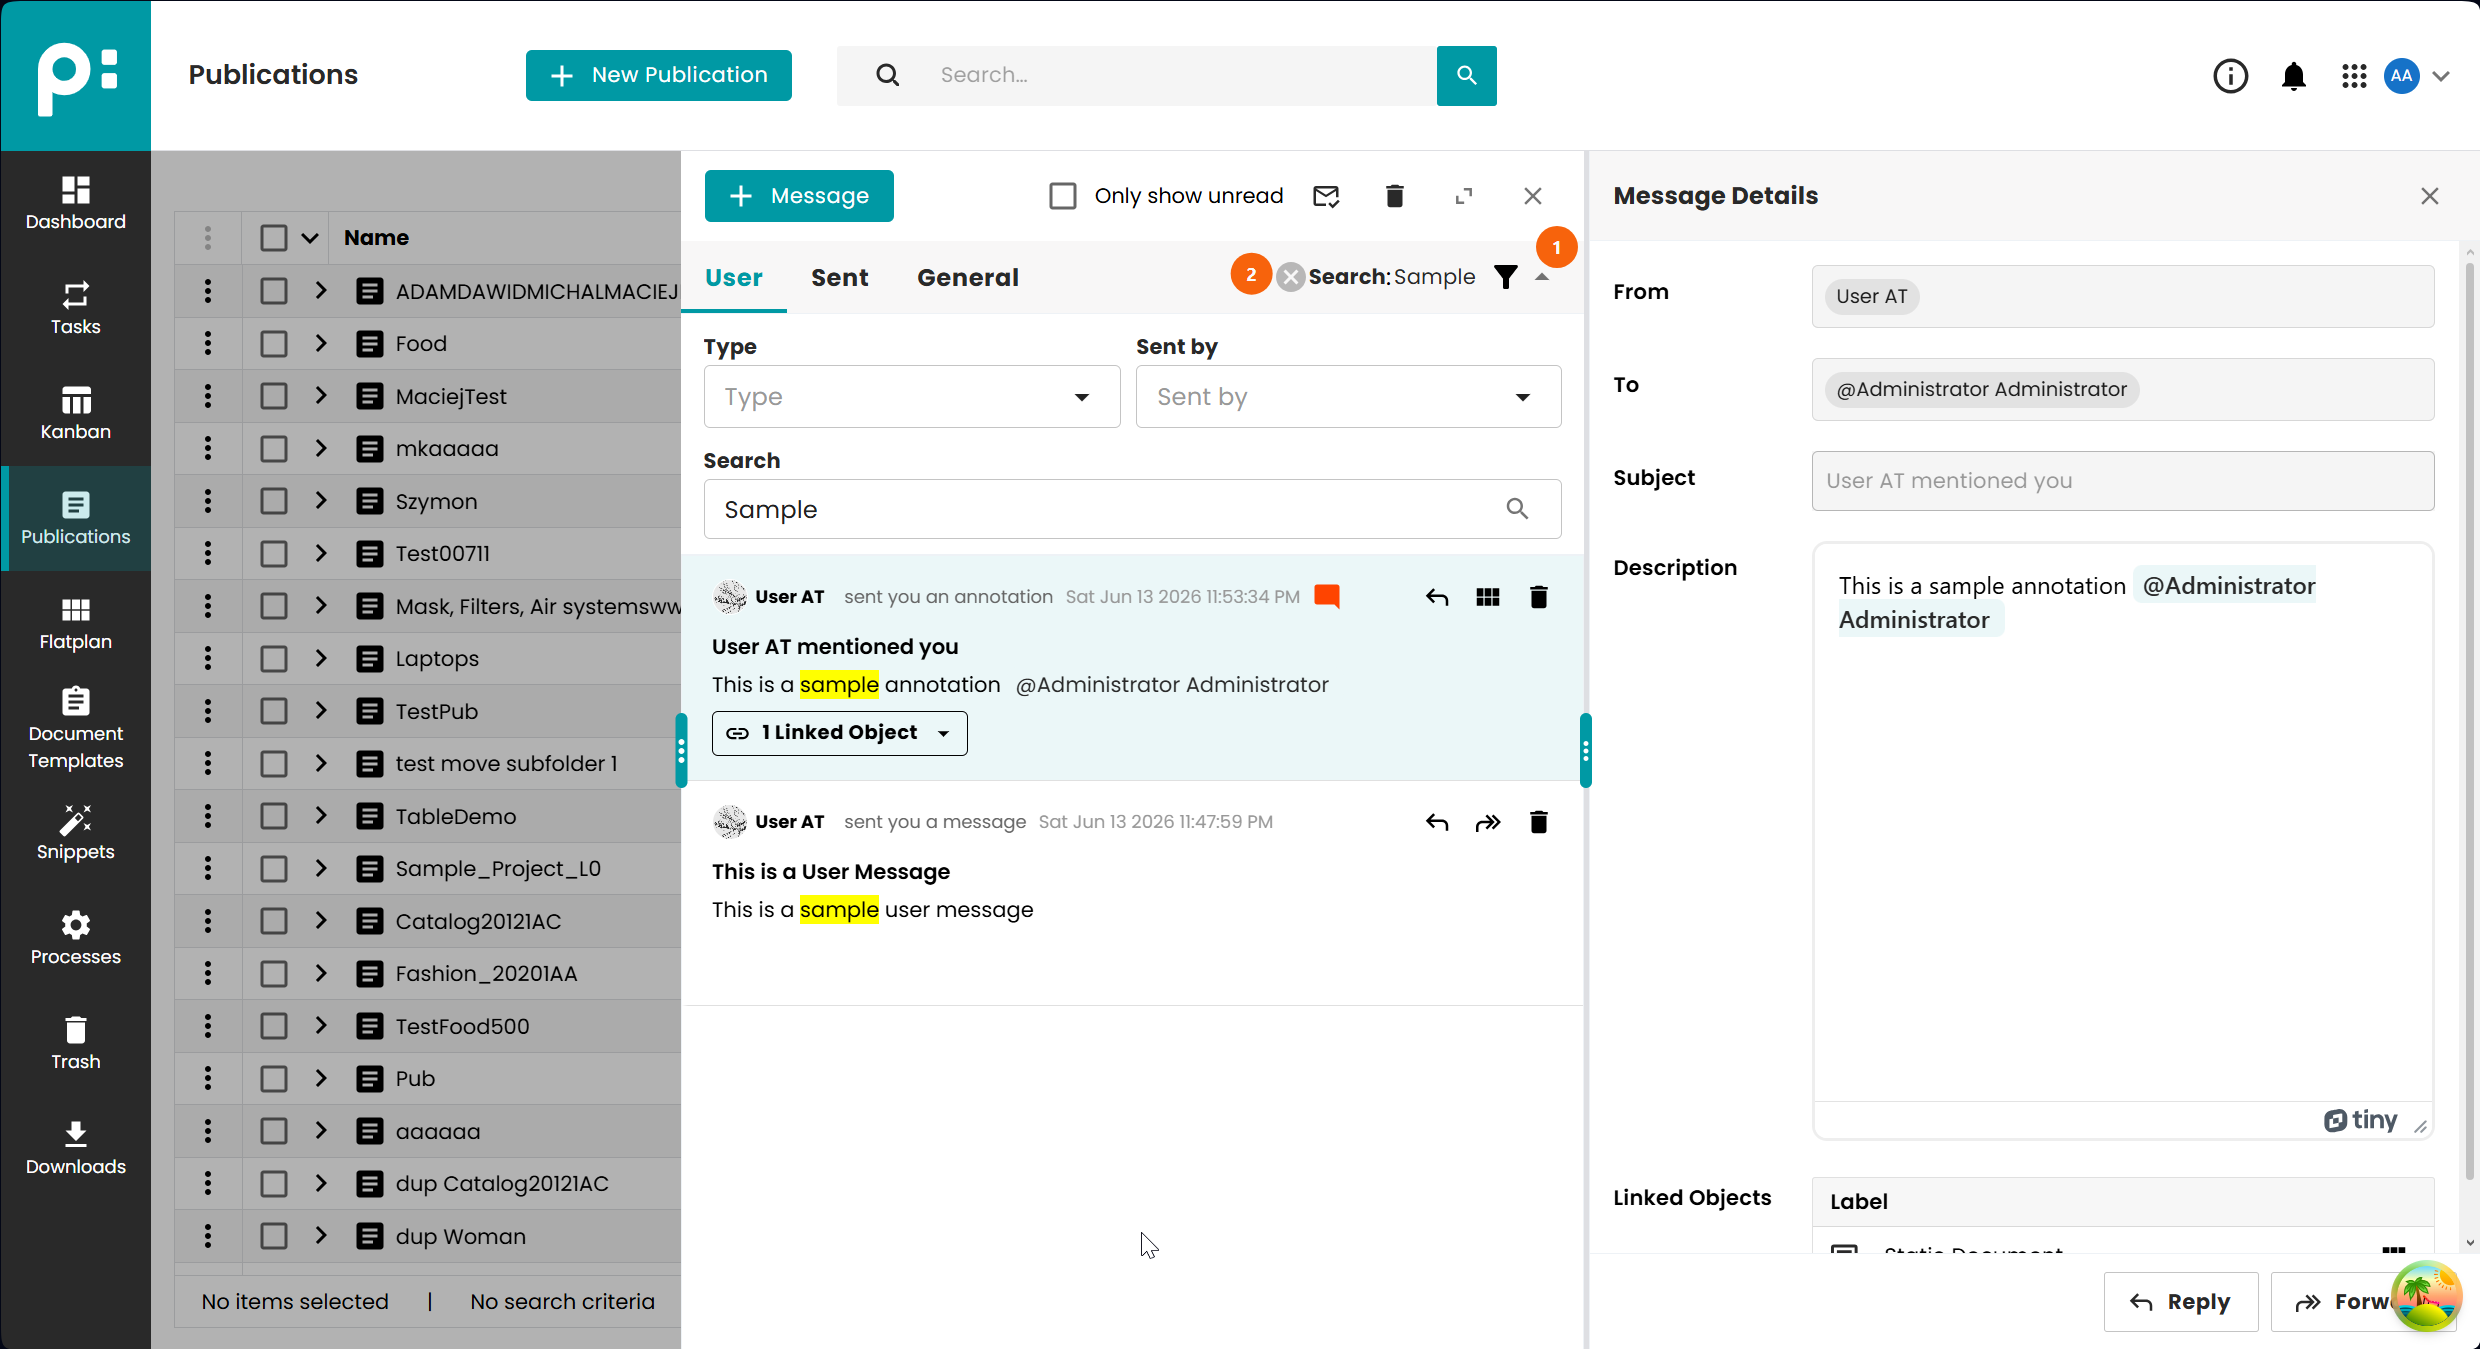
- The filter icon expands and collapses the filter panel.
- An active filter indicator strip appears below the toolbar when filters are applied. Clicking the × on the strip clears all filters for the current tab.
8.1 User Tab Filters
| Filter | Description |
|---|---|
| Only unread | Shows only messages that have not been read yet. |
| Type | Filter by message type: Message or Annotation. |
| Sender | Filter by one or more senders. |
| Search | Full-text search across content. Press Enter to apply. |
8.2 Sent Tab Filters
| Filter | Description |
|---|---|
| Recipient | Filter by one or more recipients. |
8.3 General Tab Filters
| Filter | Description |
|---|---|
| Only unread | Shows only unread notifications. |
| Type | Filter by notification severity: Info, Success, Warning, Error. |
| Object | Filter notifications related to a specific document or publication. |
| Process | Filter by process definition (workflow type). |
9 Marking Messages as Read
Messages are marked as read automatically when their detail panel is opened. The following manual controls are also available:
- Mark as read — Available in the context of a single unread message row and in the bulk selection toolbar.
- Mark all as read — A button in the tab header marks all messages in the current tab as read at once.
The unread count badge on the bell icon updates in real time as messages are read.
10 Deleting Messages
Messages can be deleted individually or in bulk.
- To delete a single message, select it and use the Delete button in the detail panel toolbar.
- To delete multiple messages, select them ( Shift-click for a range, Ctrl for selected messages) and click Delete in the selection toolbar. A confirmation dialog is shown before deletion.
Deleting a message from the User tab removes it only from your inbox. For sent messages, deletion removes the message from your Sent tab but does not delete it from recipients' inboxes.
11 Real-time Notifications
The Message Center receives new messages in real time via a WebSocket connection maintained by the server. When a new message arrives while the application is open:
- The unread count badge on the bell icon increments immediately.
- If the Message Center is already open, the new message appears at the top of the relevant tab list without requiring a manual refresh.
- a notification snackbar is shown for a short time in the right top corner of the screen
The WebSocket connection is kept alive by a periodic ping mechanism. If the connection drops (for example due to network inactivity), the count is refreshed on the next page interaction.